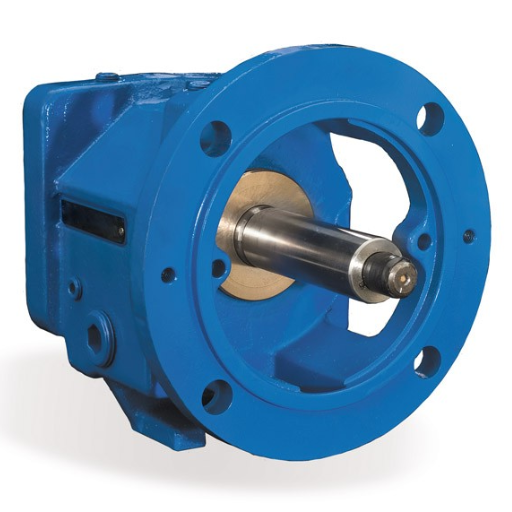
Bears on the raw water pump of your engine are one of the points that, if not taken care of, can adversely affect your Mercruiser water pump’s performance. Maintaining the pump is essential. This guide outlines the replacement of bearings and will provide instructions, necessary tools, and expert advice to help you accomplish the task . If you are a seasoned boat owner and know the nuances of boat engine care, or if you are simply a curious novice, this guide will assist you every step of the way.
How do I know if my water pump needs replacing?
What are the signs of a bad water pump?
I always ensure my engine stays in top shape, and it is paramount to look out for the signs indicating a water pump failure. First, if I observe the engine overheating, it often shows that a water pump is not effectively circulating coolant. Moreover, leaks around the pump housing are a key concern, as the seals could have failed, causing the coolant to leak. Additionally, strange sounds such as whining or grinding may suggest a defective bearing within the pump.
Analyzing the aforementioned parameters from a technical standpoint, a failing water pump can impact the coolant flow rate and engine temperature, among other things. For example, overheating is common due to the lack of coolant flow rate. Track of the engine temperature is essential to ensure it does not exceed the recommended range. If I track fluctuations or consistently elevated temperatures, it is a sign I must check the pump right away. Timely detection of these signs makes keeping the engine and its components from further damage easier.
How to inspect a mercruiser raw water pump for damage?
An initial visual examination on the MerCruiser pump should be undertaken. Pay special attention to the pump housing and the impeller for cracks, wear, and other physical defects. From there, you should inspect the impeller blades; worn out, chipped, and deformed impeller blades will negatively impact water flow during engine cooling. The final check includes seals and gaskets as any wear could result in water entering the engine and causing significant damage to the components.
Supposing you have identified any inefficiencies, examine the pump’s output pressure and flow rate. A known percentage reduction in both flow rate and pressure will directly hamper the operating temperature, which may surpass the prescribed range. Failure to attend to this will ultimately lower lubrication and increase mechanical wear. Furthermore, reduced water flow has numerous adverse effects, one of them being cavitation, which negatively impacts the condition of several components in the pump over time.
I can ensure that the pump operates optimally and that the engine cooling system efficiently circulates coolant water at the predetermined parameters. By identifying and rectifying faults immediately, I can eliminate cost ineffectiveness and maximize performance.
Common bearing failure symptoms in water pumps
When inspecting pumps, I focus on common bearing failure indicators that could affect the operational figure and the associated technical parameters. One potential root cause is excess noise or abnormal vibrations when the pump is operational. This could be due to misalignment or bearing wear, which increases mechanical resistance and directly decreases operational efficiency.
Another indicator is leakage on the tracks near the bearing, which could result from seal failure caused by bearing degradation. This will probably lead to a decrease in water flow pressure and affect the engine’s cooling performance. Moreover, a high temperature reading on the pump housing could also mean excessive friction in the bearings and lubricant system and coolant system temperature reaching the extreme range.
To guarantee that these symptoms do not worsen, I actively manage parameters like flow rate, pressure, and operating temperature, which I regularly cross-check with the specifications provided by the manufacturer. Responding to these concerns early enough virtually eliminates the risk of damage to the system and enhances its confidence and performance.
What tools and materials are needed for pump replacement?
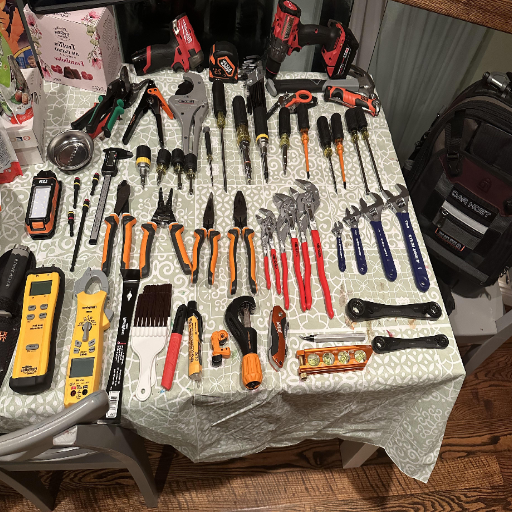
Essential tools for a pump rebuild
Wrenches and Socket Set—These are used to loosen and tighten fittings and bolts. Confirm that the set has various sizes to fit the pump’s hardware dimensions.
Torque Wrench—This is important when tightening bolts to the manufacturer’s recommended torque settings. It helps avoid over- or under-tightening.
Screw Drivers – Needed are both head flat and Phillips to remove small clamps and screws.
Pullers and Bearing Extractors – Used to remove couplings, bearings, or impellers in a manner that does not damage the components effectively.
Dial Indicator – Checking shaft alignment with a tolerance of ±0.002 inches to avert operational imbalances requires this instrument.
Feeler Gauges – Measuring clearances such as wear ring gaps on the impellers outlined in the pump guidelines must be observed.
Calipers and Micrometers are prerequisites for the precise measurement of component parts like bearings, shafts, and seals to ensure their dimensions concur with the technical parameters set forth in the pumps’ documents.
Hydraulic Press – Assists in the assembling or disassembling tightly fitted parts such as sleeves or bearings.
Lubricants and Thread Sealant—All parts that need to be lubricated should be treated according to the manufacturer’s guidance to enhance their life and reduce leakage.
Cleaning Materials – Brushes, degreaser, and co-compressed air for cleaning components marred by debris or another such residue before reassembly.
Appropriate application of these tools during the pump rebuild will ensure that technical standards are observed and that the system’s integrity and efficiency are not compromised.
Using a pump rebuild kit for replacements
Using a pump rebuild kit will make the replacement easier since all components needed to repair the pump are supplied in the kit. This manually ensures that it is compatible with the specific pump model. There are gaskets to O rings, seals, and even bearings kept in the kit that are meant to match the technical specifications. Asses the Viton and Nitrile parts’ performance as they are best for chemical and oil-based means to ensure compatibility with operating conditions.
Important parameters to keep in mind when replacing the components include bolt torque specifications, shaft alignment tolerances, and seal clearance. Failure to follow the seal torque settings can result in overcompression or leakage. Therefore, the maximum and minimum torque bolts should be 25-30 ft/lbs for blend-eliminating pumps. It is common practice to have a seal gap of 0.002-0.005 inches to balance lubrication and prevent friction damage.
Make sure debris-free is removed from each connection, and all parts are securely fastened after replacing the components. When following the correct technical parameters, all of these methods will lead to increased pump life and reliability while ensuring maximum system efficiency.
Choosing the correct seal kit for your pump
When your pump specifications and the operating conditions it will be subjected to are clearly defined, selecting the correct seal kit for your pump is straightforward. The following are the considerations and their corresponding technical parameters.
Pump Type and Application—Determine the pump model and its application. For example, centrifugal pumps may have seal kits specific to certain types of fluids or operating conditions.
Operating Pressure and Temperature—Confirm that the seals are rated for your system’s operating pressure and temperature. For instance, seals for medium-pressure environments should ideally work within ranges of 150 to 300 psi, and temperature tolerances should range from -20°F to 400°F, depending on the seal material.
Material Compatibility—Be sure that the seal material matches the compatible fluid to be pumped. For example, chemically resistant materials such as Viton, EPDM, or PTFE are selected depending on the customer’s needs. PTFE is used for aggressive chemicals, while Viton is used for high-temperature applications.
Shaft Diameter and Seal Fit—Check the shaft diameter to ensure a good seal fit. This must be done accurately, usually within ±0.001 inches, to ensure the unit works without leaks or damage.
Environmental Considerations—Regarding circumferential conditions, water cleanliness or exposure to rubs might require attention. Double or tandem seals may be required to increase durability in abrasive environments.
If the combination of all selected parameters is thoroughly analyzed and fitted to the pump’s needs, then the pump’s efficiency, working life, and chances of wearing under the assigned operating conditions will greatly improve.
What are the steps for rebuilding a water pump on a Mercruiser?
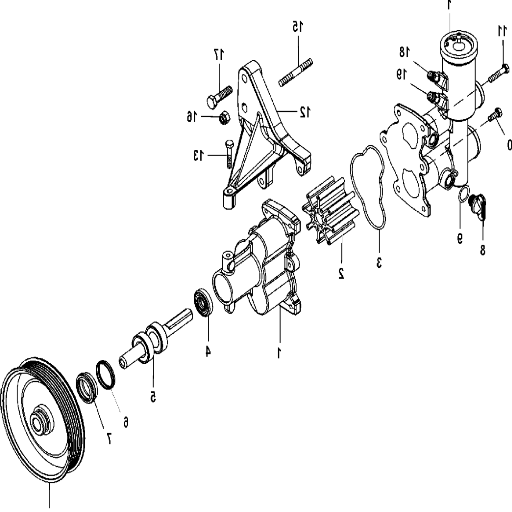
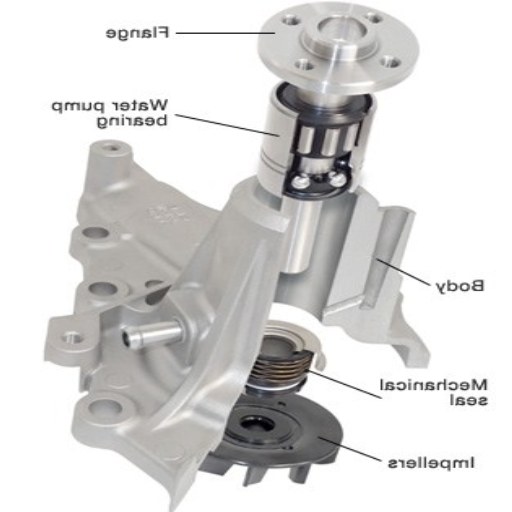
Preparing your mercruiser raw water pump for rebuild
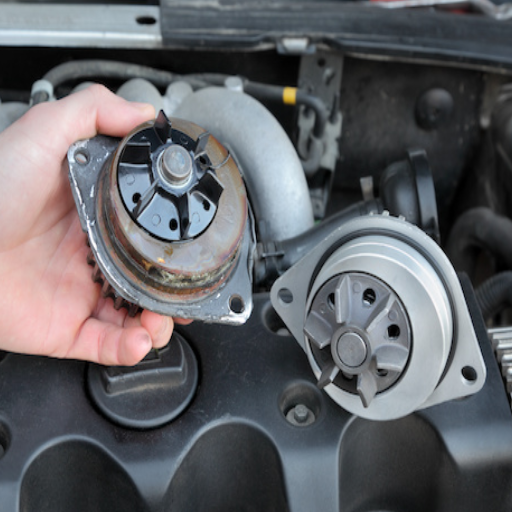
I also understand that metrics must be considered before rebuilding a Mercruiser raw water pump. With that in mind, the obstacles that would impact the restoration must be dealt with. Diving straight into the tasks, the first step would be unscrewing the pump from the engine. Plus, while disassembling everything, I scrutinized key parts like the seals and the impeller to ensure there was no damage present.
Seal Sizing: In terms of the seals, meeting the original specifications of ±0.001 inches in the replacement will ensure proper sealing without any leakage.
Impeller Condition: Regarding the seals, meeting the original specifications of ±0.001 inches in the replacement will ensure proper sealing without any leakage.
Material Compatibility: Any replacement parts must take into account the conditions the pump will operate in, such as salt water exposure and abrasive materials, to avoid other forms of damaging wear on the piece.
Torque Specifications: Every bolt needs to be tightened during reassembly so that there is no stress or misalignment. They recommend a tightness that should always be followed.
By adopting these steps, I am not only reducing the impact it may have on performance but also increasing the efficiency and durability of the pump.
Step-by-step transcript of the replacement process
Diagnosing the Issue: Identifying the symptoms associated with the reduced water flow and strange noises suggested that there was a problem with the impeller. These signs coincide with an impeller that is either damaged or worn out, and poor water circulation will greatly reduce the pump’s efficiency.
Shutting Down The System: I switched off the pump’s power supply and disconnected the power cable before enabling the electric motor to maximize safety measures during the repair process. This prevents damage or injury that can arise from the uncontrolled use of the equipment.
Disassembling The Pump: The bolts were unscrewed, and removing the pump cover was to ensure that no bolts, seals, or other components were damaged. It is imperative to note that at this stage, all parts that were disassembled need to be kept carefully to ensure that they are all appropriately assembled. Components that are not aligned properly will affect the flow of the water and the pump’s efficiency. Thus, cautious measures had to be observed.
Inspecting the Impeller: After opening the pump, I checked the impeller for any signs that it was worn out, cracked, or dented. A worn-out impeller cannot provide the needed flow rate, significantly affecting several factors, such as pressure output and the system’s overall efficiency.
Choosing a Replacement: Because my pump operates, I had to choose an impeller made of corrosion-resistant material.
Due to the presence of saltwater, I made sure to select a high-grade, saltwater-compatible impeller, which would increase durability and slow down the rate of wear. This directly affects how long the pump lasts and its reliability.
Installing the New Impeller: I applied lubricant to ease the movement and then placed the new impeller into the correct position within the housing. Following the manufacturer’s instructions, I tightened all bolts to their respective torque specifications, making sure there was no undue stress or misalignment, as this would impact rotational mechanics and flow balance.
Reassembling and Testing: I then assembled the pump, ensuring all components and seals, in particular, were secure. When I turned the pump on, I checked for consistent water flow and the absence of leaks. This indicates that the installation was successful while ensuring that the system operates at an optimal level without causing any negative impact on the technical parameters.
By following these steps and confirming compatibility and exactness at every step, I was able to change the impeller while maintaining the pump’s efficiency and increasing its life cycles.
Reassembling the raw water pump and testing
In reassembling the raw water pump, I verified that all parts, including the seals and bolts, were correctly positioned and tightened to avoid any leaks. After completing the process, I conducted a trial run for the pump, and the results were as expected—the pump displayed a steady water flow, and there were no signs of leaking, leading me to conclude that the assembly was executed correctly.
While examining the process, I made sure that the following technical parameters were noted and that there was no adverse impact:
Flow Uniformity: The water flow was uniform, with no interruptions, which confirms that the impeller was in the correct position.
Pressure Levels: The system’s pressure remained in the average operational range, testifying that it is working as designed.
Sealing integrity: Proper sealing was maintained, ensuring no leaks occurred, and therefore, pump efficiency was not adversely affected.
Rotational Balance: The impeller rotated without vibration, indicating no misalignment or other stress to the internal components.
After testing all these parameters, I was able to conclude that the reassembly did not compromise the system’s technical integrity.
How do we address pump housing issues?

Inspecting for leak points in the housing
It is important to take a methodical approach to examining the leak points in the housing, as this allows for the pump’s efficient operation. First, check the housing for any signs of damage, like cracks or wear, especially around joints, seals, and connection points.
Pressure Test: Any housing ought to be able to withstand operational pressure without forming leaks. Therefore, inspect the pump applying pressure (ensure the pressure is 50-100 PSI, depending on manufacturer specifications). Any significant pressure drop could indicate a leak.
Sealing Condition: The O-rings, gaskets, and other seals should be checked for dislocation and rough seating signs. Any damaged seals should be replaced, and the stability should be checked, depending on the fluid being pumped.
Material Integrity: For pumps exposed to corrosive or harsh materials, check for any signs of burning, corrosion, pitting, or fatigue in the housing material. Otherwise, the right conditions and aggressive fluids require the use of non-destructive testing methods, such as ultrasonic thickness, to measure the housing.
Alignment and Assembly: During assembly, improper alignment can cause stress and spring leaks, so check those seals. Carefully aligning the housing with the other components and utilizing precision alignment instruments makes checking simpler.
Applying these verifications alongside persistent engagement throughout the operational cycle ensures that the pump’s housing is still intact, sturdy, free from leaks, and uninterrupted by the demands of its application.
Repairing or replacing damaged pump housing
The following steps are to be followed while addressing damaged pump housing, ensuring all relevant technical parameters are considered:
Damage Assessment: The foremost step involves inspecting the type and extent of damage, such as cracks, corrosion, or deformation. Identifying structural weaknesses can include visual inspection, dye penetrant, or ultrasonic testing. Justifying technical parameters involves confirming the minimum allowable thickness of the housing (this can be based on ASME and ISO standards) to check whether it is possible to repair.
Repair Feasibility: Assess if the repair is viable based on material characteristics, working pressure, and temperature levels. For example, welding is feasible with metal housings if the material’s tensile strength and thermal expansion are congruent with operational conditions. Ensure that such repairs do not compromise the safety margins of the design.
Replacement Criteria: If any repairs are cost-efficient or significantly reduce performance, consider replacing the housing. For example, replacements are required when corrosion results in wall thickness being lower than the allowable limits (this can be specified using NDT results). Always choose a replacement with the same or better material specifications—grade, hardness, or corrosion resistance, for example.
Verification of Alignment and Testing: Check alignment and structural integrity following repair or replacement actions. Conduct pressure tests such as hydrostatic tests at 1.5 times the maximum operating pressure to confirm the absence of leaks in the housing while operational loads are applied.
Based on these technical parameters and justification, the pump housing that has been repaired or replaced would be expected to meet operational requirements in safety and performance.
How does a bad water pump affect your engine?
Impact on coolant circulation and engine cooling
Failing to repair a broken water pump may sabotage coolant circulation, which may cause deficient engine cooling and lead to an engine overheating. This will have the following impacts:
Less Coolant Flow Rate: The heat transfer process required to maintain adequate engine temperatures is impaired by a damaged pump impeller or worn bearing, which limits the flow of coolant through the motor.
Overheating in Areas With Insufficient Coolant: Some engine components, such as gaskets and cylinder heads, may experience localized overheating due to inefficient coolant circulation.
Cooling System Loss of Pressure: A malfunctioning pump can lower a system’s overall efficiency by preventing it from maintaining the optimal pressure level for effective coolant distribution.
Contaminated & Leaky Coolant: Issues with sealing or worn-out components in the water pump can lead to leaks. Internal wear may also be signified by contamination in the coolant.
Understand the context and its associated parameters so that you may take measures to diagnose water pump repairs effectively.
The potential damage from a water pump is leaking
A leaking water pump can result in a myriad of problems that do not only affect the performance of the engine but its durability as well. Significant possible problems include:
Overheating of Engine: A leak diminishes the number of fluids readily available in the system, which does not allow for engine cooling. Excessive heating can cause cylinder heads to heat more than usual and can even wreak havoc on head gaskets.
Loss of Coolant Pressure: A leak also reduces the system’s pressure, which is crucial for the optimal movement of the coolant within the engine. Lack of pressure causes the coolant to underperform, which results in inefficient cooling and improper heat distribution.
Corrosion and Damage of Components: The ongoing loss of coolant can cause crucial inner parts like the radiator, thermostat, and water pump to rust from the inside out. This leads to more rapid destruction of the parts and increased wear and tear of the system.
Seizing of Engine: If a leak is ignored for a longer period of time, there is a high chance that the entire coolant of the engine gets lost, which causes the engine to not have sufficient lubrication, leading to the portion of the engine components fusing with one another.
It is pivotal to get a water pump leak fixed as soon as possible to avoid any additional damage and avoid making extensive repairs. To achieve maximum effectiveness from a vehicle, regular inspections and following the manufacturers’ maintenance schedules must be followed.
Frequently Asked Questions (FAQs)
Q: How will I know that my Mercruiser raw water pump bearing requires changing?
A: Some of the common signs are abnormal sounds originating from the vicinity of the pump, increased levels of water consumption to achieve cooling, water seeping into the bilge, or apparent signs of rust around the pump shaft. If you observe any of these signs, dealing with them without delay is vital since the water pump is an essential component of the Mercruiser Mercury cooling system.
Q: When should I perform bearing changes on my Mercruiser raw water pump?
A: The timing of bearing replacement is conditional to the amount of usage and general working environment. Boats operating in highly corrosive environments require greater bearing replacement and maintenance. In the case of best practice, it is best to check the pump every year and change the bearing within 3 to 5 years, barring any sign of excessive wear, in which case they should be changed sooner.
Q: Can I rebuild my water pump rather than fully replace it with a new model?
A: Yes, a raw water pump rebuild is frequently feasible and can sometimes reduce the cost of replacing the entire unit. This involves the inclusion of an impeller, shaft, roller bearing, and gaskets. If the pump housing is extensively corroded or compromised, a complete replacement would be necessary.
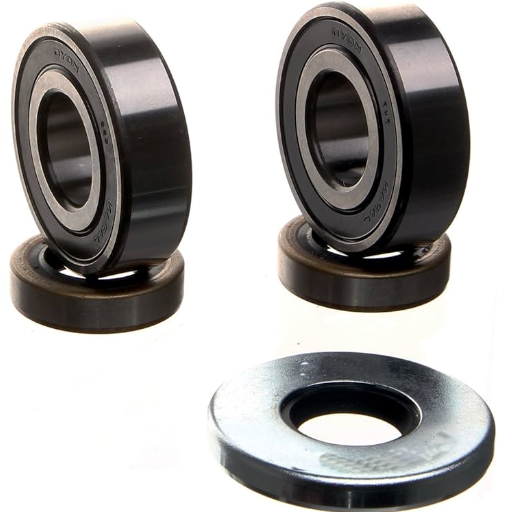
Q: What tools do I need to replace the bearing on a Mercruiser raw-water pump?
A: Bucks for transport tools comprise a hammer, a punch, wrenches, snap-ring pliers, and a bearing puller. You will also need replacement parts like new bearings (most of the time, Koyo), gaskets, and possibly a new impeller. In addition to this, I would recommend having a service manual for your specific Mercruiser model (5.0, 5.7, 6.2, etc.) within reach.
Q: How long does replacing a Mercruiser raw water pump bearings take?
A: The time needed can change based on your skill level and the pump’s current status. While an expert mechanic typically takes 2-3 hours on this job, a DIY enthusiast can expect to spend anywhere from 4-6 hours on this project, particularly if it’s their first attempt at performing this maintenance task.
Q: What happens if the water pump stops functioning while I’m on the water?
A: If the water pump becomes inoperable while you’re out boating, it can result in the engine overheating and damage. The pump is connected to the engine and revolves a body of water to cool it. During such an instance, you should turn off the engine immediately to prevent further damage. It is better to have an additional pump with you or break the water leak using inbuilt tools and skills, which will enable you to make it back to safety.
Q: May I replace the raw water pump bearing in my Mercruiser inboard engine, or should I seek service?
A: It is feasible to perform the bearing replacement on one’s own if one has a certain degree of mechanical mastery, but most boat owners prefer leaving it to the hands of trained muscle. It requires certain equipment as well as some particular know-how, and errors can be quite expensive. If you wish to undertake it yourself, consider asking the owner’s forum for your model Mercruiser for a guide with videos.
Q: What is the average price for bearing replacement on a Mercruiser raw water pump?
A: It depends on if you do it yourself or get someone to do it for you. DIY costs are usually between $50-$150 for the parts alone (bearing, gaskets, and impeller). Professional service can range from $200-$500 depending on how much the labor costs and any other parts that need to be replaced. As with all issues, the sooner you tackle the problem, the less you will have to spend in repairs in the future.