Changing the bearing and seal of a water pump may seem impossible, but with the right strategy, tools, and help, this can be made simple. This article is meant for amateurs and professionals wondering how the replacement process works. It does not matter whether the unusual noises, leaks, or functionality problems in your water pump system are the reason for performing this repair; this article will guide you on how to perform it effectively and safely. You will get information on everything, from the essential tools to completing the repair confidently. So stick with us while we outline everything you need to know!
What are the signs of a failing water pump bearing?
Unusual noises from the engine compartment
Sounds that are unwanted and unusual from the engine compartment often suggest that the water pump bearing may fail. From what I know, these sounds usually come forth as a grating, whirring, or shrilling noise that worsens with time as the bearing goes bad. This is due to the wearing out of the bearing’s inner parts, leading to friction and misalignment. If this isa neglected set of issues, it can directly impact specific issues like:
Coolant Flow Rate: With the increased damage and wearout of the bearing, the impeller’s efficiency is crippled, or the impeller simply can’t provide sufficient flow for the coolant to circulate. Overheating of the engine is bound to happen.
Belt Misalignment and Damage: Due to the failure of the bearing, there is excessive resistance and play, which can put the belt on the pump under load, which can lead to slippage or excessive wear on the belt.
Engine Temperature: With a damaged water pump bearing, it can’t and does not perform work and, therefore, impacts the cooling system, and the temperature goes high to a critical level, which is bound to overheat the engine.
Always remember to address these issues as fast as possible to improve the engine’s overall performance and the cooling system.
Coolant leaks and overheating issues
Leaking coolant and overheating problems are often simply signs of water pump failure. Fixing such issues always needs deep consideration regarding their effects on the engine’s functionality. To try and solve these problems:
If there are signs of coolant leaks, this usually means there is a damaged seal or gasket in the water pump. If this is left unchecked, the coolant pressure can drop, leading to improper circulation and not enough cooling. As an early sign, always check for visible coolant crusty residue or puddles near the water pump housing.
Overheating tends to happen when the water pump malfunctions due to damage to its bearings, erosion of the impeller, or blockage in the coolant system. Problems like those affect critical parameters like the engine’s operating temperature, which may go further than what the manufacturer’s specifications allow. That can cause serious damage, like warped head cylinders or a blown head gasket.
These problems need to be dealt with as soon as they are discovered so that they lead to optimal coolant flow and maintain the coolant system’s technical integrity. It is always good practice to ensure that the whole coolant system is properly inspected and parts replaced when needed, which helps prevent damage to the engine in the long term.
Loose or wobbly water pump pulley
The proper operation of the engine cooling system can be affected efficiency by a loose or wobbly water pump pulley. This issue needs to be addressed, but in many cases, it happens because of excessive wear on the pulley or its bearing, which results in instability. If this issue is not addressed, it could lead to problems with the water pump and circulation of the coolant. Other technical indicators that would be affected include:
Coolant flow rate – Overheating is risky when coolant circulation is not properly maintained due to a loose pulley.
Belt tension—Misaligned pulleys could cause excessive strain on the drive belt, resulting in slippage and poor performance of auxiliary serial components.
Engine operating temperature—The engine’s operating temperature range poses a risk of pushing the temperature of the engine boundary when there is insufficient coolant flow, which could significantly damage the engine.
The pulleys need to be tightened or replaced immediately to prevent the compromise of functionality or optimal operating conditions.
What tools do I need to replace a water pump bearing?
Essential tools for bearing removal and installation
Adequate water pump bearing replacement demands the right tools. Ultimately, every tool affects the water pump’s repair parameters. Here’s a list of tools that can help with the process:
Bearing Puller: This tool is essential to extracting the broken bearing while ensuring the adjacent parts are not damaged. Misusing it could alter the alignment parameters, which could result in vibration or imbalance.
Hydraulic or Mechanical Press: While inserting the bearing, uniform, and sufficient force is recommended; if not, it poses the risk of injury.
Socket Set and Wrenches: These are used in disassembling and assembling the pump and its components. Proper torque application is needed here to avoid overtightening, which can lead to distortion of the housing or bearing misalignment.
Sealant or Gaskets: Securely fastening the components increases the chances of fissure flows while decreasing the chances of leaking as they contain coolant. Leaks, when not contained, would cause a significant drop in cooling system performance.
Caliper or Micrometer: These tools accurately measure the bearing dimensions. Keeping information on hand ensures the selection of the correct replacement part, avoiding tolerance of misalignments.
Remember, these tools enhance bearing replacement in the best possible way while maintaining technical parameters such as eccentrics, torque settings, and coolant flow efficiency.
If proper tools are not obtained or utilized correctly, this could lead to system underperformance or incorrect component replacement.
Specialized tools for press-fit bearings
Regarding questions about specialized tools for press-fit bearings, I recommend tools like the bearing press, arbor press, and specific bearing seating tools or alignment mandrels. These tools guarantee precision during installation to prevent any form of misalignment or damage to the bearing or housing. For example, utilizing a bearing press enables the application of even pressure to eliminate distortion to the bearing races, ensuring it is seated properly in the housing.
Using improper tools can negatively impact critical technical aspects like alignment, accuracy, bearing load distribution, and operational efficiency. Incorrect installation alignment leads to an increase in friction, which increases the chances of premature failure. Similarly, improper seating alignment leads to imbalance during operation, negatively affecting system performance. It is, therefore, clear that ensuring the use of these tools is critical to the optimal functionality of your components, leading to a prolonged lifespan.
Safety equipment and precautions
I pay the utmost attention to industry standards regarding safety equipment and procedures, including the correct tools for every technical job. Safety measures need to be taken when doing installation or maintenance work, such as putting on gloves, steel-capped boots, and safety glasses to defend oneself from sharp edges or intense heat to an abrupt change of a component’s position. This level of protection is vital and directly affects technical parameters such as:
Correctness of Alignment – Proper use of safety procedures during handling increases the measures that misalignment is introduced, which may reduce system efficiency.
Distribution of the Bearing Load – Adopting proper steps during installation alongside donning protective equipment ensures balanced load distribution.
Wear and Friction—The correct approach to equipment handling and the use of tools minimizes friction, which in turn increases the lifespan of bearings and other mobile parts.
Therefore, by being observant and, to some extent, overprepared, I ensure personal safety and system reliability.
How do I remove the old water pump bearing?
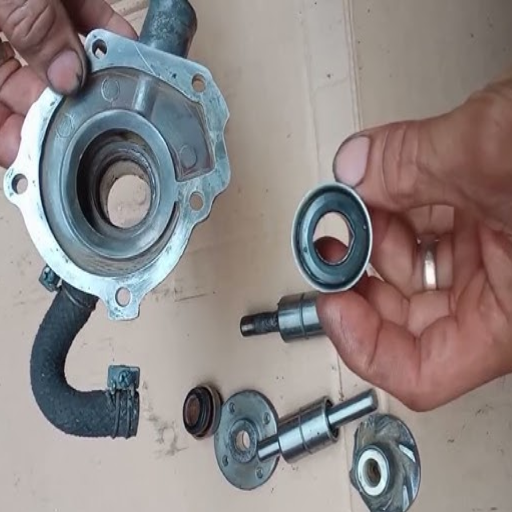
Steps to detach the water pump from the engine
I followed these instructions to safely detach the water pump from the engine without damaging related components.
Drain the Coolant System—I completely remove the coolant from the system to prevent it from spilling on sensitive components. This step avoids contamination while also preventing unnecessary wear on the other components.
Disconnect Power and Accessories—To avoid electrical hazards, I first disconnect the battery. Then, I remove all belts, hoses, and any ancillary components attached to the water pump so that there is clear access.
Unbolt The Water Pump – I am careful to use accurate tools to loosen the bolts that secure the pump to the engine block. A meticulous method ensures that the screws and threads sustain no damage.
Inspect Mounting Surface—After removing the pump; I clean any residue or corrosion on my mounting surface to ensure proper sealing when I install the new pump.
Checking the relevant technical parameters while performing these steps allows me to be certain that I am not compromising any part of the engine system.
Techniques for extracting the worn bearing
Extracting a worn bearing requires great care, as it can damage other components around it. Below are techniques and parameters that must be adhered to for a successful extraction.
Utilize a Bearing Puller – The initial device must be employed is the bearing puller. A puller the same size as the bearing must be used so that even pressure is applied to the bearing while it is being pulled out. The arms of the tool must grab the inner or outer race of the bearing while ensuring the housing is not deformed.
Apply Controlled Force—Depending on the size of the bearing, either manual force or a hydraulic press can be employed. Smaller bearings will need a torque of around 50-150Nm, while bigger ones will range from 500Nm or more, according to the manufacturer’s specifications.
Heat the Housing (if necessary)—Add heat if there is resistance. Using a heat source like an induction heater will keep the temperature controlled between 120 and 250 F (49C to 121C), preventing damage to sealant or lubrication.
Stop Using Excessive Vibrations – Anything that causes a significant impact should be avoided. Too much hammering can twist and break the shaft and housing, leading to system failure.
Use Protective Tools—Guards or covers should be used when removing the bearing because loose debris can prove dangerous. This is especially true when high-torque tools are being used.
These practices, plus respect for particular particulars, enable effortless withdrawal of a worn bearing safely without harming the rest of the engine’s components.
Inspecting the pump housing for damage
While examining the pump housing for any signs of damage, I would start by cleaning the area to ensure that all types of wear, cracks, or corrosion are clearly visible. Then, I would check the areas where the bearing sits for any scoring or other surface abnormalities that create an issue with dimensions. If damage is discovered, this can obstruct sealing, alignment, or even operational effectiveness.
A few of the highlighted technical parameters are affected tolerances in the housing, which must be within the limits set by the manufacturer to prevent misalignment, and also surface finish quality which impacts sealing effectiveness. All parameters would be cross-matched using these observations to ascertain whether the part needed repairing or total replacement. These aspects must be maintained within acceptable limits to keep the system functioning at its highest capacity and avoid further complications.
What’s the process for installing a new water pump bearing?
Preparing the pump housing for the new bearing
To prepare the pump housing before inserting the new bearing, I clean it to remove dirt, grease, or any residue left in the pump. These factors will hinder the proper fitting of the bearing in the housing. I also analyze the pump housing for possible cracks, warp, or wear. These factors can misalign the housing and lead to the early failure of the new bearing.
If any damage is found, the following items will be impacted.
Housing Tolerances—If the pump housing is warped or broken, the bearing will not fit properly, causing it to bear excess weight, which will lead to wearing out and becoming operationally ineffective. I make sure that tolerances are as per the manufacturer’s instructions.
Surface finish quality—If a bearing has a compromised finish, the seal will not cover it, causing the bearing to have uneven placement, which will lead to negative consequences in system performance. I examine surface features to ensure no leaks and misalignment are avoided.
By addressing these matters, I ensure that the pump housing can support the reliable attachment of a new bearing, ensuring that it will work properly and be long-lasting.
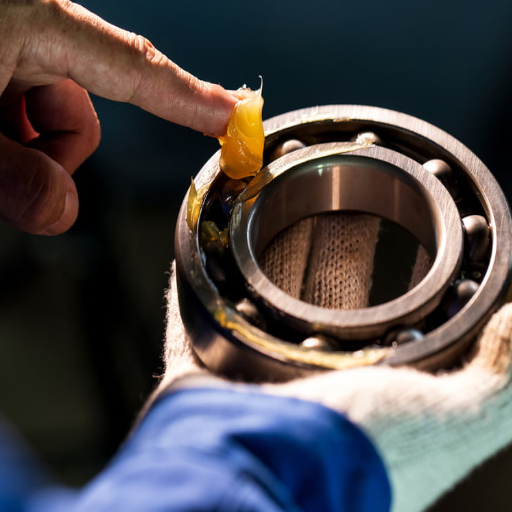
Proper alignment and pressing techniques
To achieve the correct orientation and pressing methods, the bearing is positioned in relation to the shaft, housing, and other parts before installation. This avoids the phenomenon of uneven stress distribution, which is a major contributor to early bearing failure. I make sure to use a press or other recommended installation tools to apply even pressure so that the bearing or the contact surfaces do not get damaged. During pressing, these misalignment errors can have consequences on multiple technical parameters, including:
Load Bearing Capacity—Mismatched bearings may encounter non-uniform load-bearing capacity, negatively impacting operational efficiency and increasing wear and tear.
Revolute Accuracy – Improper alignment results in vibrations, reducing revolute accuracy and affecting system performance.
Bearing Fatigue Life—Improper pressures during pressing result in stress concentrations, which drastically reduce the bearing’s life.
Following proper techniques, I ensure the operational pump can sustain these technical parameters within the optimum ranges, promoting reliability and operating efficiency.
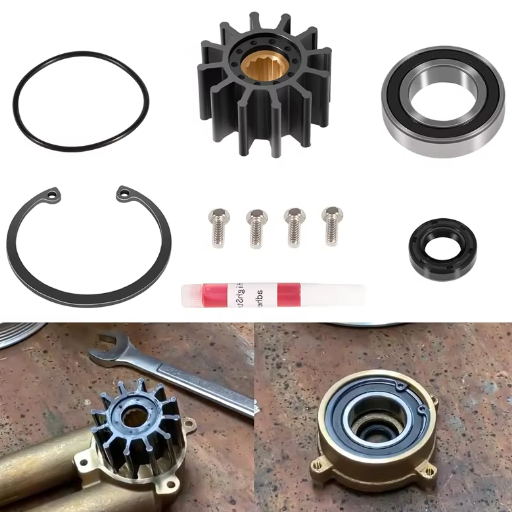
Replacing the seal along with the bearing
When I overhaul the seal and bearing, I am susceptible to the stand-alone details of the seal and bearing. A seal must be fitted optimally because, together with the bearing, it prevents contaminants from ingressing and lubricants from egressing. There are a variety of ways through which performance can be impaired if a seal is fitted inappropriately:
Load Distribution—An improperly seated seal can potentially leak lubricant, resulting in uneven load deflection and a further increase in the bearing’s propensity to wear.
Rotational Accuracy—Defects in the seal or misalignment during fitting will introduce additional parasitic torque, causing the system to rotate and vibrate irregularly, further reducing operational accuracy.
Bearing Life Cycle—Weakly fitted seals will certainly allow contamination in the bearing, which leads to an accelerated state of wear and greatly reduces its life span.
By enforcing these practices, I can guarantee that the bearing and seal alignment is achieved, thereby ensuring that the technical parameters are met. As a result, the pumps will work more reliably and efficiently.
Are there any tips for extending the life of a new water pump bearing?
Proper coolant maintenance and regular checks
Proper maintenance can extend the life of a bearing in a water pump. I like consistently monitoring coolant levels and quality because low or dirty coolant can lead to overheating and increased friction, which can be damaging. It adds a lot of extra burden to the pump and seriously impacts essential parameters.
Load Distribution: Poor coolant conditions may cause overheating, leading to broad thermal expansion and uneven load stress distribution on the bearing.
Rotational Accuracy: Contaminated coolant can also cause negative friction, resulting in tension on rotating components, which would reduce the bearing’s accuracy.
Bearing Life Cycle: Dirty coolant can contaminate the seal and bearing, causing severe system decomposition and drastically reducing the system’s life cycle.
Eliminating and maintaining adequate coolant levels without debris allows these parameters to protect smoother pumps and longer equipment life. Timely replacement and coolant inspection are vital, along with other maintenance practices that I attend to regularly.
Avoiding common mistakes that lead to premature failure
To avoid issues that cause failure too early, I strive to maintain performance and technical integrity by focusing on three areas:
Ignoring Coolant Checks: Failure to monitor coolant levels routinely can lead to contaminated coolant, which in turn can overheat the system. As previously mentioned, this has a direct effect on load distribution. Other effects include overheating stress on supporting bearings and premature bearing life expectancy due to excessive wear induced by dirt and impurities.
Seal Deterioration: As seals wear when seals are ford intermediate cracks, contaminants are allowed to penetrate the seal system. This sort of damage lowers the system’s rotational accuracy. Again, residue will gradually interfere with the movement and create friction, which will increase the bearing life cycle but will lessen due to quicker deterioration.
Wrong Type of Coolant: The system is supposed to have an interconnected core cooler for thermal control to be distributed throughout it. Using the system without the correct coolant type can lead to poor load distribution caused by overheating and affect rotation precision with poor lubrication during different conditions of operation.
When none of these issues are checked through regular checks, range preventative maintenance, and using recommended coolant types, these technical parameters become compromised, and equipment requires replacement far sooner than it should.
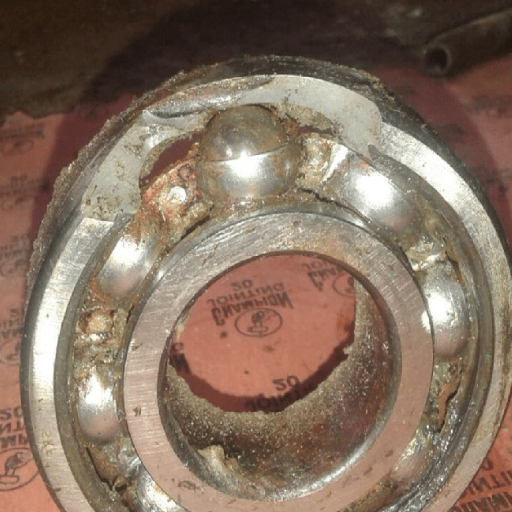
Recognizing early warning signs of bearing wear
Knowing if bearings are getting worn out is an important part of ensuring a particular system operates at peak performance. In my case, the most obvious sign would be unusual noises like grinding, clicking, or squealing while it is working. Such sounds indicate poor rotational accuracy, typically due to an unaligned part that results in increased contamination and friction within the system.
Excessive heat around the bearing area is yet another major primary warning. Bearing overheating suggests less lubrication than is required or a destructive lack of structure. Hence, it directly affects thermal management, which reduces the bearing’s life cycle due to elevated rates of wear.
Vibration anomalies are also a crucial diagnostic clue. When I encounter irregular or too strong vibrations, it most likely results from improper load application, shaft rotation misalignment, or bearing surface wear. All of these issues have supplemental negative effects on the other issues, like load imbalances.
With time, I understood the importance of watching out for these signs and correlating them to problems to eliminate damage and enhance the life of the equipment. This is important because the issue distinctly varies from one parameter to the next and requires specific rectification measures.
Frequently Asked Questions (FAQs)
Q: What tools do I need to replace a water pump bearing?
A: To change a water pump bearing, you will need basic hand tools like screwdrivers, wrenches, and pliers. A bearing puller, seal driver, and hammer may also come in handy. It is advisable to also have a repair manual for your specific vehicle model on hand.
Q: How do I know my water pump bearing needs replacement?
A: Abnormal sounds such as grinding or squealing from the engine, leaking coolant, and some measure of movement on the pump shaft or impeller are some indicators of water pump bearing failure. If you notice these symptoms, the water pump bearing is due for a replacement.
Q: Can I replace just the bearing, or must I replace the entire water pump?
A: Often, it is easier and more economical to replace the entire water pump assembly instead of just the bearing. This solves the problem of needing new parts and reduces the possibility of the issues occurring in the future. Advanced mechanics should consider replacing only the bearing and seal.
Q: How long will it take to replace the water pump bearing in your vehicle?
A: In essence, this can change depending on your skill set and the type of vehicle you own. A DIY Fan may take anywhere from 2 to 4 hours. Professional mechanics at places like Bulldog Automotive may be able to do it in less time. Always check and follow the specific vehicle repair instructions in the letter.
Q: Are there any risks of replacing the water-bearing yourself?
A: Yes, there are certain risks you have to be aware of. A poorly done arrangement can result in coolant leaks, engine overheating, or damage to other components. If you do not fully trust your self-assuredness, leaving the replacement work to a professional would be much wiser. Also, watch for hot parts and sharp edges while attending to the internal workings of the vehicle.
Q: How do I detach the old bearing from the water pump in my vehicle?
A: To get the old bearing, you need to unfasten the water pump from the engine block and lift out the old bearing from the pump casting using a bearing puller. Be careful not to split the pump housing. Some pumps may need the impeller removed first, so be cautious. Like earlier, checking and following your vehicle repair instructions is essential to ensure the correct procedure.
Q: What should you do after installing the new water pump bearing?
A: After fitting the bearing and assembling the water pump, ensure that all bolts are properly tightened. Belts like the serpentine belt that were removed during disassembly should also be reattached. Fill the cooling system with the appropriate amount and type of coolant, and then start the engine. Check for leaks, if any. In some cases, the cooling system will have to be bled to remove air pockets.
Q: Are there any related maintenance tasks I should perform while replacing the water pump bearing?
A: It would be smart to look in the area and replace the thermostat, drive belts, radiator hoses, and other parts that may need replacing like the alternator and power steering pump. Maintenance to other components will help in the long run and save time on future replacements.