Pool pump bearing replacement might feel overwhelming, but with the right resources, changing the bearings on your Century motor would only require you to go through this step once unless it is a significant replacement. Please read this guide carefully, as I will detail every step of the process. This includes helpful information and the tools and methods you would need. The end goal here may be to get rid of troubling noise, boost the pool pump’s performance, or ensure the motor runs for a long time; either way, this article can help you. By the end of this task and using best practices for your pump, you can safeguard the motor.
What are the signs that my Century pool pump bearings need replacement?
Unusual noises from the pool pump motor
In most cases, rough noise produced by a pool pump motor is the first sign of the bearings needing replacement. In this case, the sounds could be harsh metallic due to grinding, screeching, or whining sounds, usually resulting from the bearings getting worn out from friction or dirt.
Decibel Level—New or well-maintained pool pump motors operate at sixty to seventy decibels. If they start at 80 decibels, this indicates an issue with the bearings.
Motor Vibration: High vibration values (micrometers or mm/s) captured with a vibration meter may indicate worn-out bearings.
RPM Performance—The Revolutions Per Minute should remain relatively steady during regular motor operation. Lower values may indicate more excellent resistance due to failing bearings.
Temperature – an infrared thermometer may indicate that the motor overheated. This, along with a noisy operation, could imply that the cause of the noise lies in the bearings, which have become damaged, thus increasing the friction.
In the event of handover of damage, which includes these factors and the rough sounds made by the pump motor, bearing replacement should put off further deterioration of your pool pump motor, followed by the restoration of the standard operating conditions.
Decreased pump performance and efficiency
Loss of efficiency and pump performance can often be attributed to bearing wear, blockage of impellers, or motor misalignment. These issues can decrease the flow rate, increase power consumption, and lead to poor water circulation instead of optimal pump utilization to attain the intended goal.
Flow rate (GPM) – a drop in gallons per minute (measurement of flow) for unexplained reasons may indicate pump inefficiency might have arisen due to mechanical or blockages.
Motor power consumption (Watts): Some internal resistances or wear and tear in machines increase the power consumed, but no corresponding improved performance is exhibited.
Head pressure (PSI): Below–expected pressure readings may be due to blockage or wear, which reduces the pump’s circulation.
RPM (Revolutions Per Minute) – A rate of RPM below or above the rated level may result from missing the right components that align the pump.
Studying these parameters and correcting the failures efficiently improves the pump’s energy and performance.
Visible wear on the pump shaft
Increased pump shaft wear can drastically affect its performance and longevity. Allow me to provide a summary concerning the matters in question:
Possible Factors Negatively Impacting Operations:
Improper positioning of the pump in regards to the motor leads to inconsistent distribution of stresses.
Pulling hammer rotors from the blasting cabinet, thus resulting in unbalanced rotors, is a cause.
A lack of lubrication produces a high friction rate, destroying the shaft.
Rusting caused by a chemical mixture or a saline environment destroys pump components and parts.
Parameters that Need the Greatest Attention:
Due to excessive wear, the diameter of the shaft exceeds the manufacturer’s tolerances; it is necessary to measure the shaft diameter periodically to the manufacturer’s tolerances. E.g., if shifting at around ±0.002.
Recommended ground vibration levels should not exceed ISO standards, Indeed vibration analyzers can be used to measure vibration when attached to the pump.
According to the manual, the pump must constantly be lubricated correctly, either below or above the recommended oil mark; for example, the minimum oil height mark should be at least the maximum.
Control the minimum and maximum oiling levels the pump receives and ensure that it lubricates the pump as the provided manual states.
Always use a dial gauge to confirm whether the shaft’s runout is within acceptable limits to eliminate and prevent errors.
Proper gauging of these technical parameters, followed by appropriate maintenance work, can effectively address the pump’s wear and tear. This guarantees smooth functioning and allows the pump to operate effectively and efficiently while performing its required tasks over its estimated life span.
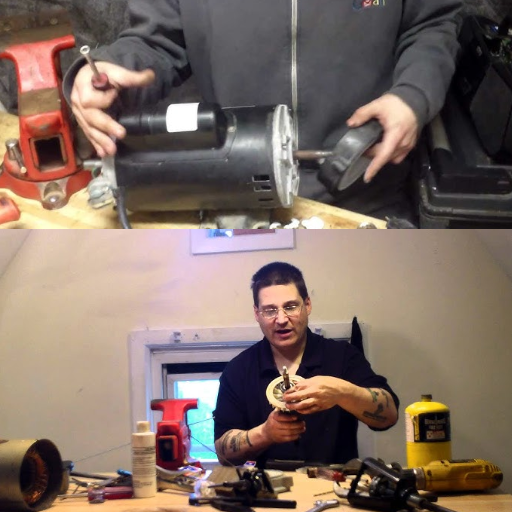
What’s the step-by-step process to remove the old bearings?
Disconnecting and removing the motor from the pump housing
First and foremost, however, safety should be prioritized: Take off the motor and ensure that processes are conducted smoothly and safely. According to standards, procedures should be verified using a multimeter.
As a precaution, if the pump contains any fluid, it must be drained out entirely since removing the motor will cause spillage. Properly dispose of fluids according to health and safety regulations to prevent risk.
Another task that requires enabling labeling of necessary components, such as the motor, during the disassembly process is disconnecting the electrical wiring. When working with terminals, use appropriate tools to loosen the parts and note how they are connected.
Now that it’s been established that rotation is an important aspect to consider, it is necessary to ensure it is noted for the coupling and mandrel to be removed. A flexible link connects the motor and pump shafts, so confirming that this link is not damaged by removing the necessary gears is also crucial.
Of course, the step after involves finding the link fastened to the base plate, then removing the bolts connected to it while also being careful not to loosen bolts or mounts.
Using a strap with a capacity suited for the motor and weight equipment always makes sense. The reasoning is that it makes lifting motors off the housing far more straightforward than it was.
Following these steps will minimize the risk of damaging the equipment and removing the motor in an unsafe environment.
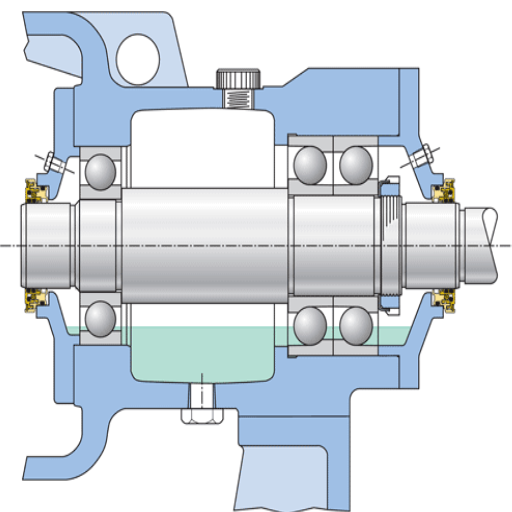
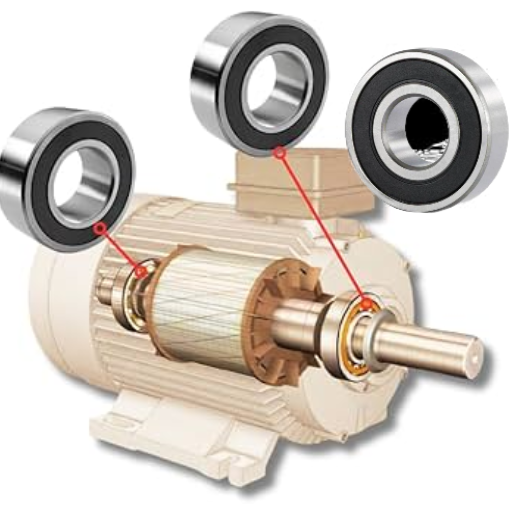
Accessing the front and rear bearings
Follow these steps sequentially to remove the front and back bearings from the motor. This will guarantee that the work is perfect and safety is not at risk.
Remove Bearing Covers: To begin with, unscrew the bearing mounts. These are pretty delicate, so ensure that you do not overturn screws when you are reassembling and use adequate equipment such as a torque wrench. It is also essential to check the torque values for these fasteners in the motor technical manual.
Inspect the Bearing Fit: Determine whether the bearings are correctly seated in their respective housings. The tolerances should comply with standard industrial fits, which are H7/k6 for rotational components and H7/m6 for fixed components, depending on load and application. This is crucial for adequate functioning, wear resistance, and maintenance.
Extract the Bearings: The bearings can be gently removed from the shaft using a puller rated to handle the tonnage of the gears that need to be removed. Ensure that the pulling-off force is within permissible limits to avoid straining the shaft or the housing. For instance, heavier motors might need pullers rated to 10 tons.
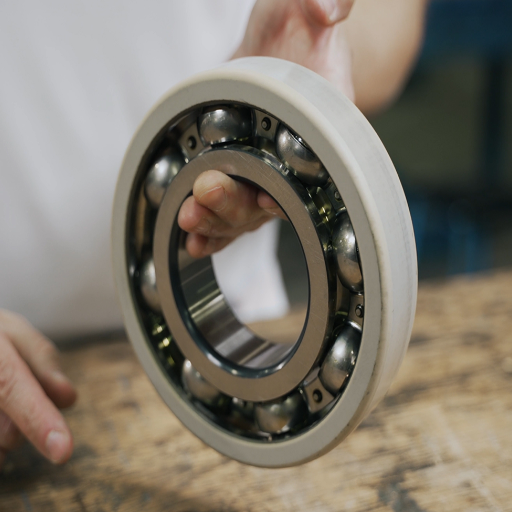
Examine the Bearing’s Condition: The bearings should be checked for signs of wear, corrosion, or excessive heating. Using a micrometer, check the inner and outer diameters against those provided by the manufacturer. All bearings that are outside the Holden range should be replaced.
Record the Bearing Specifications:
- Type: Determine whether the bearing is a deep groove ball, roller, or angular contact bearing.
- Dimensions: Measure the inner diameter (ID), outer diameter (OD), and width. For instance, a 6204 bearing has an ID of 20 mm, an OD of 47 mm, and a width of 14 mm.
- Load Rating: Note the dynamic and static load ratings and ensure the replacements meet the original requirements.
Considering the maintenance of the device configuration parameters, the state of the front and rear bearings can be inspected and evaluated, and the dismount site can be prepared for safe replacement or reinstallation. Each motor has service-focused guidelines that provide further direction.
Using a bearing puller to extract old bearings
Employing a bearing puller is a very effective method of removing old bearings while avoiding any damage to nearby parts. To achieve proper extraction, perform the following steps:
Applying the Correct Bearing Puller: It is essential to choose a bearing puller based on the sort and size of the bearing to be detached. For example, a three-arm puller is recommended as it maintains balanced forces on the bearing, while a two-arm puller can be convenient for limited spaces.
Attaching the Puller on the Bearing: Puller arms should be adjusted towards the outer side of the bearing, with all arms positioned equally around the bearing. This will ensure that the arms do not apply excessive pressure on one side, causing damage to the housing or shaft.
Pulling with Care: Now close the screw with the assisting mechanism or the puller slowly, which would facilitate the bearing being pulled away from the shaft. Provide a small amount of penetrating oil to the bearings for those stuck due to rusting. This will soften the environment and assist in the process.
Considerations before Beginning :
Bearing Size: It is also essential to ascertain that the puller being utilized considers the bearing’s dimensions, such as inner and outer diameter and width.
Puller-Rated Capacity: Naive practice involves using a lower-rated puller than required to accommodate the bearing’s load. This can cause several instances of equipment malfunction.
Clearance: The clearance around the bearing to be utilized should be verified as sufficient so that other components do not interfere with the tool.
This allows for confident reference to the technical specifications of the bearing datasheet or service manual when replacing the bearing.
How do I install new bearings in my Century pool pump motor?
Cleaning and preparing the motor housing
Before installing new bearings, it is essential to clean the bearing surface. I ensure there is no dust, grease, or debris in the area. To accomplish this, I take a clean cloth and a surface cleaning solution with appropriate properties to wipe the bearing’s housing. Next, I examine the surfaces for evidence of corrosion or damage and replace or sand them if required. The casting must be smooth and clean to ensure the new bearings are seated correctly.
Bearing: Check that the inner diameter of the housing for a specified motor, as in the Century motor manual, is free of manufacturing defects that can affect the bearing’s fit.
Bearing fits: I check to ensure the maximum roughness of the joining surface does not exceed 1.6 Ra (in micrometers) so that the bearings do not collapse during torsion exercises.
Climate Control: Verify that the motor housing and bearings are at room temperature, approximately 20-25°C, since temperature differences can alter fitting tolerances.
With these parameters verified, the housing is set to go to the assembly, which is expected to enhance the motor’s performance once it is back together.
Proper technique for inserting new bearings
To properly insert new bearings into a mechanism, please abide by the following steps and technical parameters:
Checking Proper Cleanliness: I make it a point to clean the housing and the shaft thoroughly so that any dirt, grease, or dust particles that may obstruct the proper fittings or damage the structure long term are removed.
Bearing Alignment: Before Installing the bearing, I align it correctly with the shaft or the housing so that no excessive force is applied unevenly to the fitted items during the fitting process. This is done by addressing the potential wear and tear issue on the fitting.
Fitting of Bearing While Using a Fitting Kit or A Tool: A press tool or a bearing fitting kit is used to apply fittings of bearings, restricting damage. However, hammering can be done only at the minimum range possible in instances where a kit isn’t available while avoiding direct force to the bearing.
Adjustment of Temperature: Placing the bearing in extremely cold or extremely warm conditions can increase its chances of being fixed, so while placing the bearing in the extreme, I ensure that the alteration doesn’t affect it structurally.
Paste Lubrication: To assist with placement, I apply a small quantity of lube lubricant to the bearing and its surface to decrease friction.
Several other factors come into play when installing the bearing, considering all the mentioned ones increase the chances of the bearing being installed, increasing the motor working size.
Replacing the seal and reassembling the motor
When replacing the seal, I always ensure the appropriate seal is selected according to the motor’s design and specifications. For example, in applications that require seals for high temperatures or exposure to chemicals, I would prefer materials such as Viton or Teflon due to their resiliency and robust nature.
Seal Removal: Using a seal puller or other appropriate tools, I carefully remove the worn and damaged seal to prevent damage to the housing or shaft surface.
Inspection of Seal Groove and Shaft: Before attaching the new seal to the new shaft, I thoroughly examine the groove and shaft for scratches, dents, or wear and tear. If there are slight scratches, scrapes, or minor damage, I can polish the seal in its place or replace the shaft entirely.
Approach to Seal Installation: To aid installation and prevent the seal from drying out, I first smear the new seal and seal the surface with oil. Then, I use a seal press or similar tool to insert the seal into the groove, ensuring it is in the right place with minimal chances of leaks.
After I replace the seal, I assemble the motor, observing every part so that it does not constitute an imbalance, leading to excessive movement when in use. I then tighten the bolts or fasteners, ensuring they are within the manufacturer’s recommended specifications, such as the torque used on the bolts or rivets.
In the end, the last step I perform is a functional test to check both the sealing and turn motor to examine the conditions in which it would usually operate. This systematic procedure guarantees trustworthiness and functionality.
What are common challenges during pool pump bearing replacement?
Dealing with stuck or corroded bearings
When a corroded or stuck shaft bearing is encountered, it can become a hurdle in pool pump service. We experience these problems due to deep moisture penetration or chemical exposure, as well as rust that either makes the bearing fused to the shaft or completely unusable. To alleviate these issues:
Apply Penetrating Oil—Apply a high-caliber penetrating oil and leave it for 10 minutes. This will allow the oil to loosen the rust buildup around the bearing shaft, further enabling the bearing to be usable.
Use a bearing puller—In such cases, you need a proper puller to remove the bearing efficiently without damaging the shaft or nearby components. Using a puller of a matching size would allow for better control.
Apply Heat (optional)- If the bearing is still stuck a heat gun could help loosen it, however take care not to go beyond 300 degrees Fahrenheit as this could deteriorate the material used.
Inspect the shaft- Once the bearing has been removed, a scrub using fine grit sandpaper would allow the screens on the replacement part to be tightened and provide a better fit.
Propelling service in such ways would secure the pump’s functionality while avoiding damage to the motor and pump.
Aligning the impeller and shaft correctly
To properly assemble the impeller and shaft, I take the following steps for an accurate assembly. The steps are as follows:
Cleaning of the Mating Surfaces—I clean dust, corrosion, and dirt from the shaft and impeller mating surfaces. Cleaning these surfaces guarantees that even when pushed together, misalignment won’t occur, and they will stay tightly in place.
Verifying Shaft Dimensions – I confirm if the shaft’s diameter matches the manufacturer’s specifications by acquiring a measuring micrometer. For example, if they say the diameter shaft should be 1.25 inches with 002 inches tolerances, they must uphold the tolerances as a requirement for the fittings.
Positioning the Impeller: I pass the impeller down the shaft slot until it is in place within the keyway or the alignment markings. The impeller should be implanted with care. Being easygoing reduces the chances of vibrations and wear during operations. If a key is needed, I ensure it’s intact and not damaged to fit the impeller without issues.
Checking Axial Alignment: I use a dial indicator to check the axial run-out of the impeller with the shaft. A permissible run-out, such as 0.001 inches, guarantees that rotation at high speeds will not cause imbalance.
Tightening fastening elements according to torque values – I torque the nuts and bolts that mount the impeller to the shaft according to the specifications. For instance, some bolts might need at least 25 ft-lbs of torque just so they wouldn’t come off while not overwound, which might lead to the destruction of components.
Final adjustments for alignment: I turn the assembly by hand to check that the impeller rotates freely and shows no signs of wobbling or dragging. This check is the last assurance that the assembly is appropriately aligned and that the system will work properly.
By respecting the technical parameters, I can assure you that the impeller-shaft assembly will be concentric and free of play.
Troubleshooting after reassembly
What I recommend is going through the system of the machine step-by-step after it is reassembled, keeping in mind the engineering parameters, which are:
Excessive Vibrations—My first defense measure is inspecting the impeller runout. I want it to be no more than 0.001 inches. If it exceeds this limit, I inspect for misaligned or warped components and readjust them as needed.
Uneven Rotation or Wobbling – Besides misalignment, wobbly fasteners also contribute to the impeller wobbling. I cross-check both these factors, and if they are alright, I next make sure the bolts are torqued at the recommended 25 ft-lbs since this neither disturbs stability nor damages the fasteners.
Obstruction or Resistance – I go through the dismantled apparatus to ensure it matches the appropriate positions or if there are some foreign components or particles; in that case, I also cross-check places where there may be interference or if excessive torque is provided. All these parameters comply with the guidelines.
Noisy Operation – Lack of vibrations, alignment of essential parts, and proper lubrication allow many components to work obstructed by noise. I cross-checked all these parameters to ensure zero inconsistencies were observed in the machine.
While reconnecting every device in the system, it is essential to remember the requirements and pointers first; this indirectly guarantees an efficient and effective machination assembly.
How can I extend the life of my new pool pump bearings?
Regular maintenance tips for Century pool pumps
I service the bearings of my Pool Pump with the Century pool pump instructions in mind and adhere to a strict servicing routine. This is what I do:
Lubrication Checks – I carry out regular checks and topping up lubrication as directed by the Century Pool Pump Manual. If indicated, the required lubricant and quantity help control friction and get the best out of the bearing.
Proper Installation: I follow the instructions to the letter, ensuring I ease all the components into their correct places as I install the pump. The operational clearances of the movable parts should comply with the tolerances offered in the manual because poor alignment would cause these moving parts to wear unreasonably fast.
Debris Prevention – With pumps, it is vital to ensure that debris does not collect around the pump or any moving parts, including the strainer basket and filter. This helps prevent excess strain from being placed on the bearings.
Monitoring Operating Temperature – Bearings tend to be uplifted most of the time, so the temperature ranges need to be monitored without extremes to degrade the components in place. I check in on the operating temperatures occasionally using an infrared thermometer, and as long as it stays within the required range, I have no issues.
Noise and Vibration Monitoring: I check for vibrations or other unusual noises, which may indicate bearing deterioration or possible misalignment. Once detected, I quickly address the root cause to prevent the damage from worsening.
By following these steps and considering the specific parameters provided by the manufacturers, I make sure the Century pool pump bearing will stand the test of time.
Proper lubrication and care techniques
The best source for learning about the best lubrication and bearing care techniques is the manufacturers, who explain their recommended techniques for optimal bearing functioning. Good water-resistant grease will be used for lubrication according to the pump’s requirements. The grease is applied at periodic intervals indicated in the manual, generally every 3 to 6 months, based on the pump’s usage and environmental conditions. Such specific pump requirements require me to use lithium-based NLGI Grade 2 grease.
I also avoid lubing the machine too much, as too much grease can cause overheating and decrease operating efficiency. As indicated in the technical documents, I check the amount of lube necessary for the machine using the relief ports or grease fittings when they are present. I gauge the temperature using an infrared thermometer to ensure that the bearings are within 120°F to 180°F (49°C to 82°C) under regular conditions.
Regular cleaning is likewise paramount. No dirt, moisture, or chemicals accumulate around the bearings. For instance, if the pump operates in a high-humidity location, I look for corrosion or moisture issues and rectify them by reinforcing sealing conditions. In extreme cases, desiccant packets are utilized. All these practices prolong the bearings’ practical life and their reliable function.
Signs to watch for future bearing issues
To ensure the pump’s efficiency, I monitor the warning signs, which inform me when failure is imminent. I look out for several indications: whirring, grinding, or a rumbling sound. These all suggest irregular movement and could indicate concern for me. High-powered vibrations usually accompany such abnormality. Therefore, I have also installed a vibration meter to assist me with detecting oscillation.
Another aspect that is essential for the smooth function of a pump is heat. Thermal regulation, in this case, lies explicitly between 120°F and 180°F depending on the situation, but anything above that suggests over lubrication, dirt accumulation, or too much force is applied. An infrared thermometer is employed to measure precise data. Once that is done, symptoms such as a grease-based fluid or oil flowing out are also checked, as they might indicate cracks, seals, or microns of dirt inside the contamination.
The operating system is based on routine monitoring, which can respond to and interact with the pump’s signs and warnings to eliminate problems before they occur. However, this also increases the chances of a technical failure.
Frequently Asked Questions (FAQs)
Q: How do I replace the bearings in my Century pool pump?
A: Replacing the bearings of your Century pool pump is not difficult. First, remove the motor from the pump housing. Then, unscrew the bolts holding the motor shell together. Gently pull both the back and front of the motor. Next, detach the rotor part shaft assembly. Eliminate the old bearings and fit the new bearings in the right place. Lubricate the new bearings. Finally, put the motor back together and ensure everything is in its correct position. Finally, put the motor back onto the pump housing.
Q: What tools do I need for a Century pool pump bearing replacement?
A: The essential tools required for replacing the bearings in a Century pool are possessed by the pool maintenance company; however, the list of tools that I would suggest includes the following bearing replacement equipment: A universal screwdriver tool kit, a socket wrench tool kit, a rubber hammer, a puller for bear remover (optional), a lubricant and lastly a heat gun. Remember to use gloves and safety goggles. You might find having a repair guide or seeing a video explaining how to do this work is helpful.
Q: How do I remove the seal when changing pool pump bearings?
A: The seal can be removed by following these steps: Locate the seals on the shaft between the impeller and the motor and pry the seal out using a flat head screwdriver, careful not to damage the shaft. You could use a seal puller tool if the seal just won’t budge. After removing the seal, clean the area properly to place a new seal during reassembly.
Q: What clues show my Century pool pump requires bearing replacement?
A: When noticing loud grinding or squealing noises coming from the motor, excessive vibration and overheating of the motor, among other signs, can indicate the need to replace bearings in your century pump. Water is also visible, protruding from the shaft seal area. When noticing these signs, changing the bearings is important to avoid further damaging the pump or motor.
Q: How often do Century pool pump bearings tend to wear out?
A: For average users of a Century pool pump, bearings are expected to last around 3-5 years, although it varies on how the pump is utilized and taken care of. However, if unusual noises, vibrations, or quality drops are observed, it is better to check those bearings regardless. Basic upkeep, such as keeping the motor up and dry, would also help prolong the bearings’ lifespan. Several pool pump owners don’t like leaving it to chance and getting it changed every 3-4 years to avoid sudden failure.
Q: Is changing one bearing at a time or replacing both only recommended?
A: To avoid any future complications, changing both front and rear bearings, even when only the latter of the two is worn out, is advisable. The primary intent is for both ball bearings to wear out and be replaced together since they are worn out equally most of the time. Thanks to technological advancements and e-commerce resources or suppliers, pre-packaged bearing sealing kits are readily available, eliminating the need to change each component separately.
Q: How do I find the correct replacement bearings for my Century pool pump?
A: To find out what the correct bearings for your pump are, try to look at the nameplate and part numbers on the motor for the model. Alternatively, you can also inspect the old bearings for bearing numbers on their surface. Use these numbers and Century’s parts catalog, or ask a professional in the pool supply business. Also, make sure the replacement bearings fit your pump. Many of the more common Century pumps have standard bearing sizes that are easier to find.
Q: Do I have to buy the shaft seal every time I get my pool pump bearings replaced?
A: Yes. It is safer to replace the shaft seal every time pool pump bearings are replaced. As the name suggests, the shaft seal prevents water from entering the motor and usually gets worn or damaged during the bearing pull-off process. Replacing the shaft seal and new bearings gives a good seal and reduces any chance of water getting into the motor, causing damage. Most bearing replacement kits include a new shaft seal for this purpose.