Although it may appear that bearing replacement on a Hayward pool pump is insurmountable, this task can be completed even by amateur ‘do-it-yourselfers’ provided they have the right tools and proper instructions. Through this instruction manual, I want to take you through the critical-to-handle aspects of ‘bearing replacement,’ which include identifying worn-out bearings, searching for compatible replacements, and replacing the bearings. These do-it-yourself techniques increase the pump’s life expectancy and help avoid pricy repair or replacement expenses. This article is essential as every pool owner, at one time or another, has to deal with problems such as bearing noise, decrease in pump performance, and other issues. All symptoms indicate the need to replace or repair the bearings of the Hayward pool pump.
What are the Key Moments in Hayward Pool Pump Bearing Replacement?

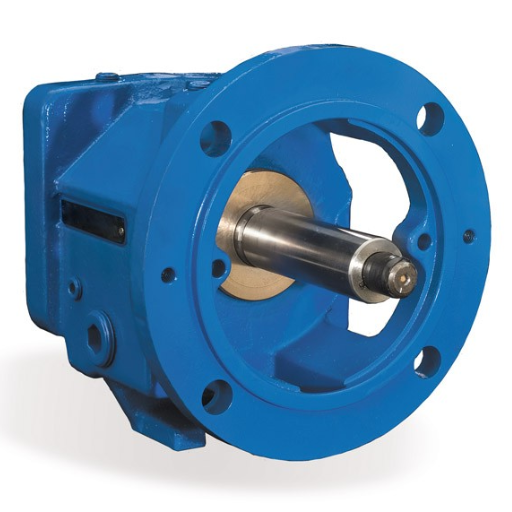
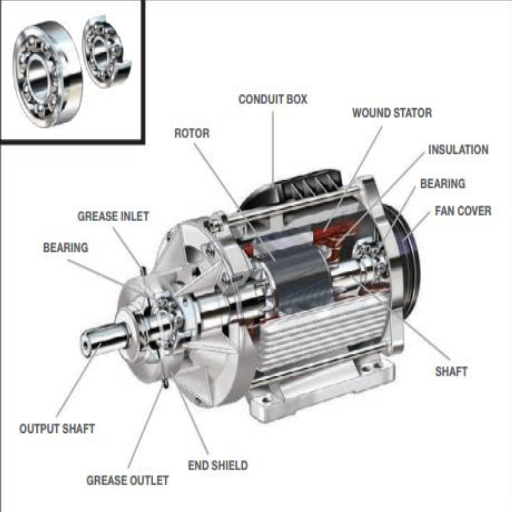
Understanding the Pump Bearings and Their Function
Hayward Pool Pump Bearings, embedded within the motor, immensely help reduce friction while the pump spindle rotates. Most of these bearings must be in good condition for the pump to work optimally. However, moisture congestion or incessant usage may eventually damage these bearings, causing them to underperform and become louder than the pump ought to be.
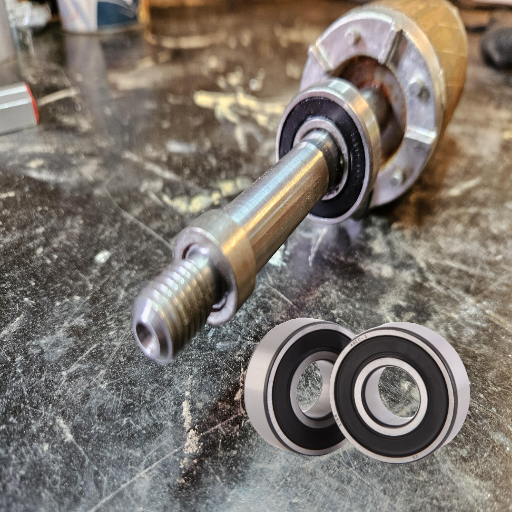
Material Composition: Most of these bearings are made from Steel or Ceramic due to their strong resistance against corrosion and wear and tear.
Bearing Size: Hayward pool pumps, on the other hand, comprise the 6204 or 6203 types of bearings, which are most widely considered and adapted.
Application: They could withstand the thrust and radial loads formed during the motor’s operation.
Rotational Speed (RPM): The bearings must withstand an operational speed of over 3400 RPM for a Hayward pool pump.
Sealing Type: A waterproof bearing must be used to subdue exposure to water, dirt, and dust, thus maintaining life and enhancing the performance of the joints.
Being vigilant about the mentioned details allows one to effectively care for the bearings, which enhances the power and functioning of a pool pump and gives it a longer life span.
Identifying Signs You Need to Replace the Bearings
Why is it vital to keep tabs on your pump, and when should you change your pump bearing? It is painful to keep damaging your motors and harsh on your pumps when they are not working correctly. Below are significant noticeable aspects that would assume risk to your bearings along with methods and procedures to further provide insight into their existence: Unusual Noise: A whining, grinding,… This is likely caused by excessive wear that interferes with the smooth rotation of the internal parts. On the other hand, excessive decibel noise levels such as 70 dB or more in a standard residential pump setting should be addressed immediately.
Vibration: Damage to or imbalance in a bearing can lead to excessive motor vibration. Systems are built to function within normal parameters, and bearings are one of the most critical aspects; abnormal vibrations may affect performance and stability.
Overheating: As bearings wear out, they create friction, leading to heat buildup around the motor casing. Considering the motor surface temperature reading rises more than the recommended limit of 120F or 49C, you should check the pump.
Reduced Performance: It is better to confirm the parameters such as the flow rate and the pressure check with the manufacturer’s provided specifications rather than the pump’s pressure and flow or water as the pump may have damages inside and depend upon keeping checks with the water pressure.
Pumps work better when the damaged bearings are replaced, or the symptoms are taken into account. Motor repairs are expensive, and this increases the lifespan of the pool pump system.
Gathering Tools and Preparing for the Replacement Process
When replacing the bearings of your pool pump, it is essential to organize the tools and operations step-wise. Below are the tools and materials that I usually bear in mind and ensure are ready before commencing on the task:
Screwdrivers (flats and Phillips): These are used to unscrew various bolts to gain access to the motor’s internal components.
To undo the nuts and bolts of the motor casing covering, socket sets or wrenches (in appropriate sizes) are used.
Bearing Puller Tool: This is crucial for removing the old bearings while avoiding damage to the motor shaft.
Replacement Bearings(check with the manufacturer): To be functional, replacement bearings should be proportionate to the original size and type. Standard sizes are 6203 or 6305 bearings, but refer to pump manuals for the size to be safe.
Rubber Mallet or soft hammer: This is used to stroke the new bearings into place gently.
Lubricant/Grease (appropriate: non-conducting and causes the least heat) This has been very useful in functioning the new bearings and increasing their durability.
Rags and a Cleaning Solution (such as isopropyl alcohol) are used to wipe off rust or dirt that might have gotten stuck on the shaft and casing of the motor.
Multimeter or voltage tester: These devices will enable you to ensure that no current is flowing before the unit breaks down.
I always check the manufacturer’s guide to avoid mistakes related to incorrect bearing clearances, improper torque levels, or the wrong kind of lubrication. Thus, the manual is usually the best place to start whenever I try to replace any components in the pump.
Check items like required pump pressure or flow rate per the specifications against the manual before starting to avoid uncalibrated motors after repair. After gathering these tools, I cut off the actuators, disconnected all power sources, and drained the pump. This creates a favorable working environment. Proper or appropriate planning prevents unnecessary errors during replacements.
How to Remove the Motor from Your Hayward Pool Pump?
Steps to Safely Remove the Motor
Cut-Off Electricity: The first crucial step is ensuring all power sources are turned off. I do this by turning off the circuit breaker, which connects the pool equipment, so there is no electrical accident risk.
Disconnect Electrical Wires: The first reasonable step is to isolate the electricity. Candidly speaking, it is self-explanatory that working on an operational motor is very dangerous. Therefore, the first action is disconnecting all the wires attached to the motor. The motor must always remain isolated until it is necessary to reconnect the cables.
Detach Plumbing Connections: Before undergoing primary surgical operations, it is essential to understand if the electrical connections disrupt the flow of fluids. Once I switch sequences, I will eliminate all the sites bound to create a fluid spillage and unite the rest.
Unbolt the Motor from the Pump Housing: Afterwards, I will initiate the unfastening of the Housing from the structure by applying some oil (ergo greasing). By accomplishing this, I will eliminate unnecessary attachments, including bolts, seals, and nuts, which are bound to create friction that causes wear. It will also require minimal energy to separate the parts while preventing damage.
Slide the Motor Out: Now, I will repeat the process for the other part while ensuring I condition the surfaces with oil so that any unnecessary bond growth does not materialize. To avoid initiating the sliding motion at the wrong angle, I will first consider how the other side was aimed when the bounds were restricted.
Completing these tasks, I am ready to begin the core of my operation while ensuring smooth transitions throughout all attachments without causing damage to any equipment or endangering myself.
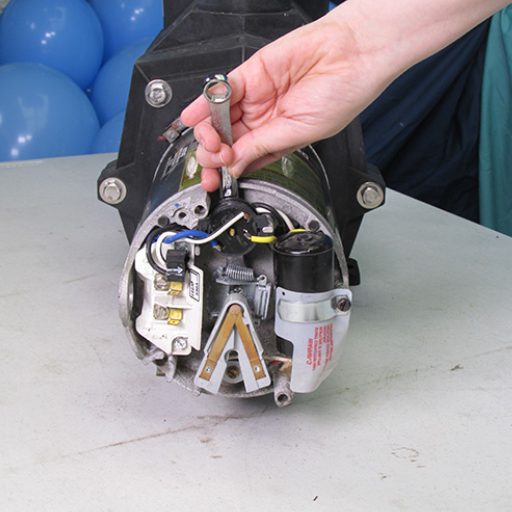
Disengaging the Electrical Connections and Taking the Screws Off
To begin with, I ensure that the wires are not exposed to potential shock and confirm that the relevant electrical parts source has been switched off. Also, using the multimeter, I can test the machine to verify that there’s no plug left and the currents are free from residual voltages. I undo the wiring connections from the terminals and mark them to aid in reassembling. Furthermore, Reassembly calls to introduce numbered tags for each of the wires to reconnect them at a later time step quickly.
While untightening the mechanisms, I use appropriate tools corresponding to screw types, for example, a flathead screwdriver for flathead screws (basically to prevent stripping the screw) and others such as Phillips heads. Commonly used size ranges for the screws range from M4 through M6, and the length range on the screws is from 10mm to 30mm. Since most parts tend to be the same, naming containers to place the screws in will make it easier to locate and reassemble the machine.
Handling the Motor Shaft and Other Components
While initially handling the motor shaft, parameters such as rust, damage, or wear should be examined not to affect the machinery’s performance. Along with the visual inspection, micrometers or calipers are vital as they pinpoint the shaft size. A 6-20 mm calibration range is adequate for standard motors, but check their manufacturing range before using them. To take parts such as couplings or pulleys off a gear puller or press is required, this ensures no bending is done.
In the case of seals, screws, and bearings cross examination is of utmost importance wherever the screw is inserted, this ensures a snug fit without too much tilt in all ends. The proper grades of oil or grease must be applied to the bearings to minimize friction and heating. This is important as it is common for the average bearing proportions to lay between grades 608 and 6202. Once the seal is fitted, it must be secure; otherwise, leakage may occur. Always organize and label all components during the disassembly so that reassembling doesn’t take long while ensuring all alignments are intact.
What is the Process for replacing the Bearings on a Hayward Super Pump?
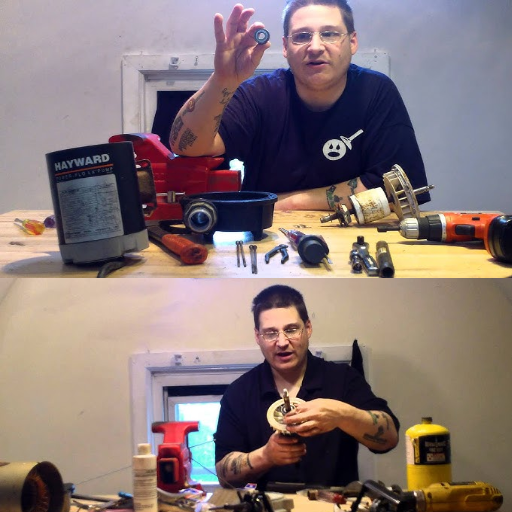
Using a Bearing Puller to Extract Old Bearings
The first step is disassembling the pump and removing old bearings using the bearing puller. During this step, I also ensure that no other shaft or equipment components are damaged.
As a first step in preparing to remove the bearings, I ensure the leg length of the bearing puller is well adjusted before mounting it on the old bearing. Once I have changed the leg length correctly, I carefully turn the puller’s threaded rod clockwise to apply force to the old bearing gradually.
Before proceeding to further steps in the process, it is crucial to select a suitable bearing puller. Ensure the type of puller chosen already corresponds to the type and size of the old bearings, irrespective of them being two-jaw or three-jaw
Another point to remember is to pull the correct bearing out according to the maximum force exerted, ensuring the puller’s limits are satisfied before extraction. During the fitting process of extracting components, always remember to employ the correct class size while selecting their dimensions.
Moving on to measures taken to keep the component safe, using a soft-jaw vice or cover is recommended to avoid deforming the element. Similarly, vices and protective covers are highly advised to protect the shafts.
Last, the force applied during the previous step should be gradual enough to align the necessary components and prevent the internal shaft components from fracturing or tearing.
These guidelines will provide the best and most efficient outcome while ensuring everything is performed correctly.
Installing the New Bearings Correctly
To have a proper implant of the new bearings, I pay close attention to a few key steps and the mechanical specification in question:
Shaft and Housing Preparation: Before fitting the shaft and housing, I ensure that they are entirely free of contaminants or remnants of old lubricants and cleaning agents. This helps reduce the chances of cross-contamination and ensures that the habitat is appropriately fitted.
Bearing Measurements vs. Bearing Fit: I cross-reference the bearing’s measurement against the pump’s size specifications. The correct fitting of the new bearing is essential to the device’s operation and functioning.
Adding Lubrication: A few drops of bearing grease are applied onto the bearing, fitting the shaft to reduce the friction, which would assist in fitting the two components together. The type of lubricant used will depend on the pump’s operational heat and speed ranges.
Controlled Heating for Interference Fits: If required, I apply a heat bearing for a short period on the inner ring of the bearing. This will allow the bearing to pop over the shaft. Such cuts should be heated between 80°C -120°C that is 176F-248F to avoid burning the bearing.
Correct Orientation and Installation Force: I center the bearing on the shaft and then take the barrier press or bearing installation tool, applying gradual forces. This helps prevent it from being misaligned or deformed at any time.
Final Examination: After installation, I check both the motion of the shaft and the bearings and their relative locations to ensure that no space is left unattended and that neither rotation nor movement is obstructed.
If all the steps are correctly followed, it can help ensure that the newly installed bearings have the desired functionalities while prolonging the device’s durability.
Reassembling the Pump and Ensuring Proper Alignment
The pump reassembly is carried out stepwise so that the installation sequences for the components are not mixed. I first align the casing half-covers using dowel pins or alignment guides. This precaution helps avoid any possible mal-alignment during assembly that could compromise the pump’s performance. Following the manufacturer’s torque specifications, I apply all bolts uniformly with a torque wringer. This technique guarantees that the casing is appropriately clamped and sealed as required. For instance, when 30 ft-lbs is the specified bolt torque, I apply it, concentrating on working it across in a patterned sequence.
Before mounting or installing the frame, the first thing to do is calibrate the dial indicators or laser alignment aids to ensure proper pump motor alignment. The alignment tolerances are not permanently fixed and vary depending on the equipment used. However, as a practice, the figure should not exceed 0.002 inches, and for parallel nonalignment, 0.05 degrees would be a reasonable limit. Adherence to such alignment principles and tolerance reduces excessive vibration, reducing bearing and seal fatigue. I tightened the coupling to ensure compliance with the alignment standard and subsequently checked the whole system to confirm the optimized parameters.
Finally, I run a final check with the pump set at nominal pressure and flow, ensuring no leak, strange sounds, or vibrations and that everything operates per the design conditions. Such elaborate reassembly steps ensure the maximum reliability of the pump system.
How do you reinstall the motor and test the pool pump?
Fastening the Motor and Reconnecting Electrical Components
The first step I take to secure the motor is to place and adjust it to the appropriate position with the pump housing, which is critical for the proper assembly and functionality of the unit. I then evenly tighten every motor mounting bolts, so that the motor is not misplaced, usually these bolts are rated between 15-25 ft-lbs depending on the manufacturer guidance. After the motor is in place, I attach the electrical components by wiring them according to the sequence displayed on the motor configuration charts, ensuring every motor wire is connected correctly and isolated. Also, in terms of applying proper caution, I check whether the voltage power supply translates to what was shown on the nameplate, for instance, 115V or 230V, depending on the motor. Further, I check whether the grounding wire has been appropriately fitted to minimize electrical accidents adequately.
Once every connection is made, I perform a Multimeter electrical continuity test for complete circuits to ensure that no open circuits are susceptible. Finally, I perform a short winding test, in which current is applied to the motor to check whether the motor wall makes normal noises or vibrations. This process guarantees that the motor is positioned tightly, its wires are adequately insulated, and connections are made for proper functioning.
Evaluating the Pool Pump’s Noise Issues and Its Efficiency
The first step in evaluating the pool pump concerning the above requirements is to ensure that the system does not exceed the recommended range listed by the manufacturer and is within the flow rate range for units of consumption in gallons per minute (GPM). For example, suppose a pump is rated for operating at 40 feet head, flowing 60 GPM through the product. In that case, I also ensure that during operation, pressure gauge readings of the systems align with my standard expectation. Through the flow meter, I can ensure that the set flow rate does not exceed the targeted performance levels of the pump that can be said to be operating efficiently.
Then, I focus on noise levels by evaluating parameters by observing whether noise levels are too excessive or too small. An automated and operational pumping system should allow a quiet, steady hum. However, factors can counter this, such as squealing, rattling, or even grinding noise that probably indicates faults, such as poor bear realignment or impurity lodged into the impeller. If required, I also monitor decibel levels, ensuring compliance with the manufacturer’s standards, which are, in most situations, between 65 and 70 dB for pumps used in homes.
In conclusion, based on this systematic evaluation, I could conclude that the pool pump testing did not yield any complexities, and it also maintained the operational efficiency desired.
Troubleshooting Common Issues After Replacement
If you have repaired or installed a new pump for your pool, some common problems will likely arise. This calls for uniformity in the use of set procedures in problem-solving. Following are brief responses to these potential problems along with technical parameters of interest:
Low Flow Rate
The Definitive Causes are that the pump was incorrectly sized, the filter was blocked, or there were air leaks in the suction line.
Corrective Measures: Check the horsepower of the installed pump (or flow rate) and ensure that it is not lower than the swimming pool turnover rate, which should be 8 – 12 hours for the entire cycle. Clear any blockages in the pool’s filter and suction line.
Excessive Noise
A likely Ailment: Torn or misaligned pump bearings and debris inside the impeller.
Repair: Ensure the pump parts are well aligned and remove any debris obstructing the impeller. If the disturbance remains, swap the torn bearings for new ones. General noise levels of pumps used should not exceed 65-70 dB.
Air in the Pump Basket
Orthodox Description: Loose connections, O-ring problems, or leaking suction lines.
Relief Measures: Check the O-ring for wear and adjust the required lubrication. Conduct a suction-side leakage test to find discrepancies and ensure all the connections are tightened well.
Pump Not Priming
Possible Causes include clogged pipes, insufficient pump casing liquid, or a defective cover joint.
Actions: Before commencing work, fill the pump casing with water. Ensure the suction pipes are not blocked and the cover joint is not worn out or incorrectly installed.
Overheating
Possible Causes: Bad air circulation, humidity, wrong electricity voltage, or too many cycles are made with the pump.
Actions: The voltage should not be lower than recommended by the manufacturer (e.g., 115V or 230V), and the proper cooling system for the motor should be provided. Ensure that the pump is not operating for longer than required.
Given the detailed parameters and dealing with all the problems pointed out as needed, you can be assured that the new pool pump will function adequately, reliably, and efficiently.
What are the Benefits of Regular Pool Pump Maintenance?
Preventative Service on Your Hayward Super Pump
Regular maintenance will increase the longevity of your Hayward Super Pump and make it work optimally. For example, I always fill the pump’s body with water before initiating it. To be strenuous on the pump itself, I always clear up the suction line and routinely check the pump lid gasket for possible cuts or damages that may lead to sealing and priming issues.
I pay out attention to the voltage of the motor, making sure it is as recommended by the manufacturer to avoid thermal expansion, in the event they are different I confirm their compatibility. I schedule my equipment’s start and close times, ensuring the pump handles no more operating hours than the filtering rounds prescribed.
Finally, as part of the regular cleaning, I clean off the dirt and the contaminations within the shade of the pump basket and every debris lodged in the impeller. With these actions and the specified technical requirements for the equipment, my Wish Super Pump has also been found to operate longer while remaining trouble-free.
Rendimiento y eficiencia energética
Para mejorar la eficiencia energética y el rendimiento, me concentro en la puesta en práctica de algunas medidas que en forma directa se correlacionan con parámetros técnicos. Primero, me aseguro de usar un motor de desplazamiento variable, puesto que me permite ajustar el caudal del bombeo para dirigirse a las exigencias de filtració, lo que genera un ahorro en el consumo de electricidad. De acuerdo con los lineamientos del fabricante, se considera que una tasa de flujo adecuada para la mayoría de las piscinas residenciales oscila entre 40 – 60 gpm, de este modo equilibrio entre consumo de energía y eficiencia de operación.
La presión de filtro además la mido en el manómetro, y soy capaz de no pasarme de un rango 10 – 20 psi. Si la presión pasa del rango normal, lo que hago es limpiar el filtro, o darle un retro lavado, lo que permite la correcta operatividad, porque un filtro sucio hace que el bombeador se esfuerce más y consuma mayor electricidad. También programo la filtración del agua de las piletas fuera del horario picos de utilización propiciando que el costo de la energía sea menor, ahorrando recursos y dinero.
Por ultimo me aseguro que la bomba para la piscina comunitaria este bien dimensionada a su volumen, generalmente la bomba da una vuelta completa (ciclado del volumen) entre seis a ocho horas. Observar estas pautas y una gestión activa del sistema ha permitido que la energía total requerida al sistema disminuya significativamente sin que la eficiencia se haya visto afectada.
Preventing Future Repairs and Costly Replacements
To avoid costly purchases and repairs in the future, I implement several upgrades. First, I try to keep myself active when it comes to maintenance; this includes weekly cleaning of the pump basket and checking whether the pump motor has any unusual vibrations and sounds. Proper ventilation and dryness of the motor are maintained to enhance its functionality and prevent it from overheating. On top of that, I routinely inspect for any leaks in the casing and seals of the pump and resolve any leak problems sufficiently to prevent future leak damage, if any.
Filter Pressure: I ensure the pressure gauge pointer on the filter falls within the recommended range of 10-20 psi. If it goes beyond this range, it usually implies that the filter is rising to the occasion, which I always do by cleaning or backwashing it to relieve the pressure on the pump.
Flow Rate: 40-60 GPM flow helps translate a balanced approach towards output efficiency and the system’s energy efficiency.
Turnover Rate: I check whether the pump manages to turn over the complete volume of the water body for 6 to 8 hours when proper filtration and circulation are achieved.
Finally, I consider it essential to arrange for a professional technician to conduct an annual evaluation of the system, as this can help create awareness of problem areas before they can develop into a more serious matter. Adhering to these guidelines, I’ve managed to increase the pump’s lifespan and make it not expensive in terms of repair and replacement costs.
Frequently Asked Questions (FAQs)
Q: Could you please explain how the Hayward Pool Pump Bearing Replacement process is carried out?
A: To start with the replacement, it is essential to note that the Hayward Pool Pump Bearing Replacement process progresses with the following steps: first, the pump motor is opened up, then the old motor bearings are removed from the housing. After that, new bearings are fitted into the housing, and we put a new seal and impeller for the pump if needed. Not only the matter of having the tasks done but also the availability of the tools and the compliance to instructions is paramount.
Q: How can I figure out that the pump motor bearings must be replaced?
A: The first signs that your pump motor bearings may require replacement include strange noises from the pump, vibration while at work, and automatic leak detection, such as a pump seal rotodynamometer. If any bearing one or more bearings failure occurs, the damage will usually be severe, and the motor bearings need replacement.
Q: Which tools will I require to replace the motor bearing of my Hayward pool pump?
A: To change the motor bearing of your Hayward pool pump, you will need essential hand tools, including wrenches, screwdrivers, hammers, and bearing pullers. Remember to get the relevant seal kit and replacement bearings for that specific model.
Q: Is it possible for me to view a video on how to replace the bearing?
A: Yes, YouTube contains a video narrative describing in depth the process of replacing the Hayward pool pump motor bearings. Pictures of the entire process work well for those who learn better through visualization.
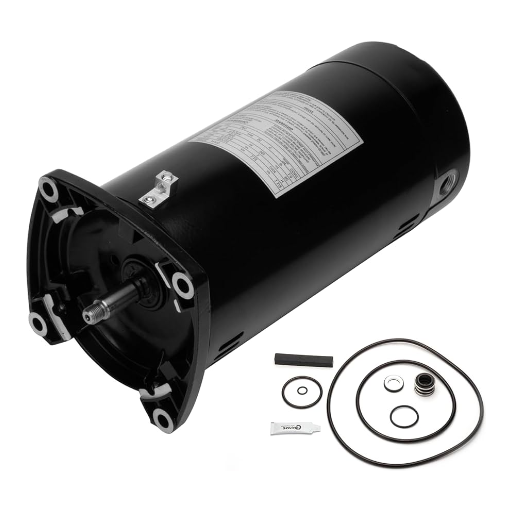
Q: What does a seal kit for Hayward pool pumps include?
A: Generally, a seal kit for Hayward pool pumps contains replacement pump seals, gaskets, and other pump motor parts that must be rebuilt to prevent leakage. It is wise to get a seal kit for your actual model of the pump head.
Q: How do I unscrew the impeller while changing bearings?
A: To remove the impeller, you must first detach the pump motor from the casing. If an impeller is stuck, try tapping it or using a bolt to loosen it, and once it loosens, you should be able to slide it off and access the motor bearings simply.
Q: How do I install new motor bearings in my pool pump?
A: New motor bearings can be placed into the pool pump after first cleaning the bearing housing to remove bits of corrosion or dirt that would affect the attachment of the new bearings. The new bearings should be tapped in as they align with the housing grooves. Before reassembling the pump motor, check to see that they were seated correctly.
Q: What is the difference between the front bearing and the rear bearing in a pump motor?
A: In pump motors, a front bearing absorbs loads on the motor’s impeller side, while a rear one supports the rotor and provides some framework support to the shaft. It means that there are two bearings in a pump motor which serve important functions, for instance, make sure the pump motor runs smoothly.
Q: Is there a need to change the shaft seal when doing a bearing change?
A: A bearing change would require changing the shaft seal. This eliminates the potential for leaks around the motor shaft, which can affect the pump motor’s performance.
Q: From where can I buy components for my Hayward pool pump?
A: Besides Hayward authorized dealers, motor bearings, seal kits, and all other replacement parts for Hayward pool pumps can be bought online from Inyo Pool People or local pool supply shops.