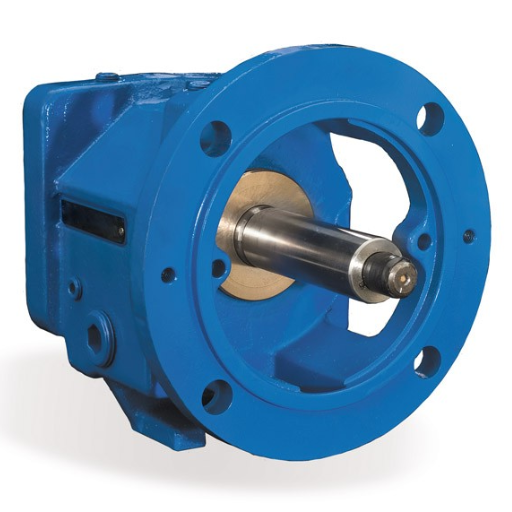
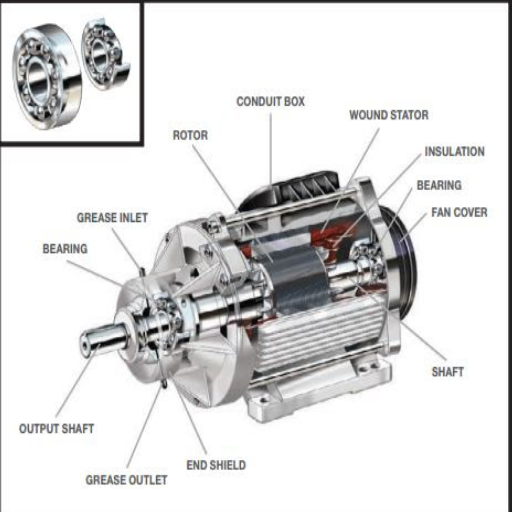
To keep your hot tub operating efficiently and lasting a long time, you need to take care of it and make regular repairs to its parts; one such part rarely addressed is the pump bearing. The pump works to provide the hot tub’s waters with the ability to flow throughout it and assists in maximizing its full potential, so it is an integral part of the hot tub systems. But as with anything else, wear and tear starts to kick in as the years go by; this subsequently reduces the efficiency of the hot tub, causes strange sounds, and is followed by the complete failure of the hot tub itself. In this guide, you will be taken through the hot tub pump bearing replacement process, from recognizing the signs of wear out to selecting appropriate tools required for the job and doing the replacement without any risks. All the spa owners looking to understand this intricate process or indulge in some do-it-yourself fun and, in progress, boost the ability of their hot tubs back to normal should find this helpful.
What tools and materials do I need for hot tub pump bearing replacement?
Essential tools: What should be in your bearing replacement toolkit?
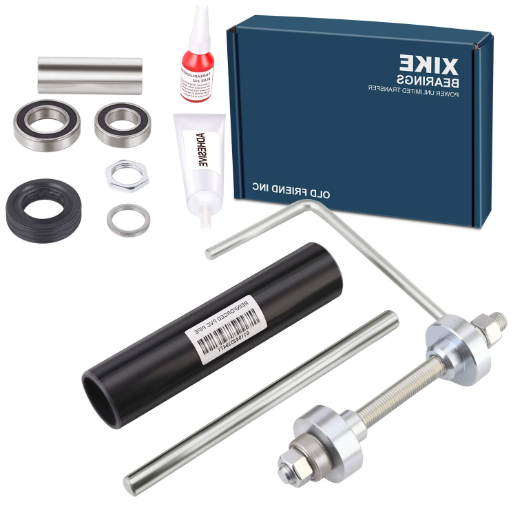
Replacing the hot tub pump bearing requires a lot of work but can be done using a toolkit equipped with tools. Here are some of the tools and materials needed.
The bearing Puller or Separator removes the old bearing without damaging the adjacent parts. One should check the type of bearing used by the hot tub pump, for instance, 6203 or 6305 size bearings (even manual will suffice).
Wrench Set and Screwdrivers – These tools will help remove the motor and the pump housing; a flathead and Phillips screwdrivers set should be enough.
Snap Ring Pliers – These snap ring pliers would be required if a snap ring holds the bearing in place.
Rubber Mallet – Very effective in moving the new bearing into place without damaging it.
Bearing Grease or Lubricant is also very important as it minimizes friction during the movement; high-temperature grease is recommended as it works well on pump bearings.
Replacement Bearing – These should be bought according to the pump’s dimensions and other specifications. One can refer to the bearing model number, usually written on the bearing or in the pump manual.
Degreaser and Soft cleaning cloth—These two aids will allow you to scrub the pump parts of dirt or old lubricant.
Work Gloves and Safety Glasses are standard protections when dealing with tools and chemicals.
These tools and reading your hot tub pump’s technical manual will help you carry out the bearing change process effectively and precisely. Remember to double-check technical parameters with the manufacturer to avoid using incompatible parts.
Choosing the correct replacement bearings: How to ensure proper fit
Bearing replacements are essential for your spa and its pump. Below, we publish helpful tips on how to install it correctly.
Check Bearing Dimensions – Before replacing your bearing, you must measure the previous bearing’s inner diameter, outer diameter, and width. Only then can you replace that bearing.
Determine Bearing Type—It is also crucial to Determine the right bearing type for your hot tub’s pump. To confirm, consult the pump’s manual or the manufacturer’s instructions.
Verify Load Capacity – It is vital that the replacement bearing chosen can withstand the same or more significant pressure that the previous bearing absorbed without damaging the pump. Look at the hydraulic and bearing manuals; they detail this information.
Material Selection – Use coated ceramic or stainless-steel bearings as they are used in wet conditions and won’t wear or corrode.
Check Speed Rating – Before replacing the bearing, crosscheck the RPM to ensure the makeup speed does not exceed the maximum allowable value.
Seals and Shields – Based on the pump’s exposure, decide whether to use shielded, sealed, or open bearings. Sealed bearings are ideal for wet and contaminated conditions.
Even in this case, check with the pump manufacturer. Otherwise, the markings on the original bearing may not correspond. The correct choice and exact measurements help ensure the proper functioning of your hot tub pump and extend its use.
Additional materials: Seals, lubricants, and other necessities
Hot tub accessories are sometimes neglected while repairs to hot tub pumps are being done. This is flawed since seals, lubricants, and other essentials must always be considered for optimal performance and durability.
Seals: A pump’s thermal and pressure ratings are the foremost aspects that must allow mechanical seals to be placed by them. For example, most hot tub pump seals are mechanically sealed against pressure up to 8 bar and temperature extremes of -20°C to 120°C. Other materials, especially carbon-ceramic or silicon carbide, are chosen depending on the durability and water quality an operator requires.
Lubricants: Molded parts of pump components require special lubricants, preferably from the silicone or Teflon-based range, that are usable in hot conditions and remain effective even in water. However, checking compatibility with your pump’s specific rubber and metal components is essential.
O-Rings and Gaskets: An O ring or a gasket should always be replaced with a new one if it shows signs of leaks to eliminate any risk of water leakage; a suitable replacement is one made from EPDM or Viton which cannot be affected by chemicals or hot water. However, it’s important to note that correct sizing is equally vital, so check the pump’s manual for the required dimensions.
Fasteners and Fittings: Screws, bolts, and threaded fittings are often missed and simplest to replace but must be taken care of as they quickly become rusted or damaged. Using stainless steel varieties is advisable to prevent corrosion in wet environments.
These materials, coupled with the specifications and recommendations mentioned above, can better condition the pump while limiting future servicing to maintenance. Always refer to the approved guidelines provided by the pump manufacturers to ascertain compatibility.
Can you provide a step-by-step guide to replacing hot tub pump bearings?
Preparing for the job: Safety precautions and initial steps
Cut the electricity: Unplug the hot tub electricity and unplug it, switching the circuit breaker to ‘off’ if possible; this guarantees safety by eliminating any risk of electric shock.
Remove all water from the hot tub: To quickly access the pump and prevent water from spilling during the repair, remove all water from the hot tub.
Collect Tools and Materials: You need a socket wrench, a screwdriver, a bearing puller, and any other specific tools required according to the pump manufacturer’s recommendations. Don’t forget to have the new bearings compatible with the pump according to specifications such as size and material based on the manufacturer’s requirement.
Check for Wear and Tear: Before dismantling the parts, properly examine the pump and motor to avoid obvious signs of damage and wear. Also, check for any rust, corrosion, or leaks developing on the mechanical parts and ensure no added repairs are required.
Use PPE: Handling tools and pump components requires using safety gloves and goggles at all times, especially if the mechanic in question is a layman; wear them to prevent injuries. Gears may be needed more specifically when bearings are fitted tightly, as force may be required.
Carrying out these practices and ensuring that bearing replacement has been done according to the measurement and component specifications provided by the manufacturer (pay attention to the model number and size of the bearings), guarantees a safe and operating point for the changes of hot tub pump bearings.
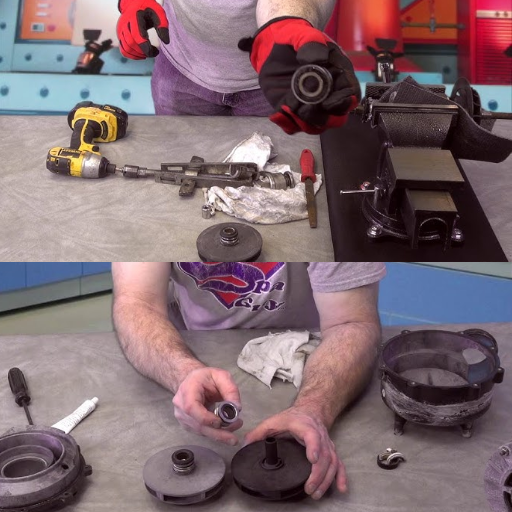
Removing the old bearings: Techniques for different pump models
Establish the type of pump model: Capturing the exact model or type of the pump may be a good place to begin. This is important because different pumps may call for different methods owing to differences in configuration and bearing positions. Ensure tools are suitable to the pump model by consulting the operation manual.
Removal of the pump shell: Start by selecting the right tool, such as a screwdriver or a wrench, and carefully disassemble the pump shell. Do not apply too much effort, as this can damage other parts that might be in the direct vicinity. Additionally, note the location of the seals, impellers, and other components that can assist during the reassembling process.
Bearings loosening: Some bearing models may be fitted by pressing them, while others may have retaining clips. If the fitting is done by pressing, a bearing puller should adequately remove the bearings. If there are retaining clips, use snap-ring pliers to remove them first.
The area around the pump cleaning: All bearing seats and areas adjacent to the bearing seats should all be cleaned with a liquid that does not affect metal through corrosion after old bearings are removed. This guarantees that foreign materials do not contact the newer bearings and interfere with their use.
By adhering to these measures and confirming the technical parameters, one is guaranteed a target-specific discharge of the pump model for safe and efficient removal.
Installing new bearings: Ensuring proper alignment and seating
Bearing Inspection Before Fitting: Examine and determine if any more surplus damage or defects have occurred before fitting new bearings. Any spare bearings installed must conform with the requirements of the pump concerning technical aspects, such as size, load able to be carried, and type of materials involved.
Get the mount ready: All the seats of the bearing that are in contact with the insertion bearing are free from dirt, rough spots, and other foreign materials. Also, an attempt should be made to measure the seating area so that the dimensions agreed upon at the time of the bearing purchase are met.
Placing the bearing: Insert the bearing into the seat by applying even pressure, settling it against the shaft, and ensuring all the parts are in line. Otherwise, wear would occur unevenly, affecting the machinery’s efficiency.
Alternative method of fixing: Install using the press to insert bearings. Care must be taken not to use excess pressure, as this distorts the area where the bearing is inserted. Covering the outer part of the bearing prevents damage within it.
Final installation: To ensure proper erection, turn the bearing around after it is mounted and observe how it rotates and free-play around the diametral area. Readings must be taken with a dial gauge if radial movement in a vertical position at the bottom of the bearing center occurs. Still, the readings taken must be within the range specified by the manufacturer.
These steps verify technical parameters, including alignment accuracy, seating tolerances, and proper fit, ensuring the new bearings will work efficiently and contribute to the pump’s longevity.
Are there any brand-specific considerations for hot tub pump bearing replacement?
Waterway pump bearing replacement: What you need to know
When changing the bearings of a Waterway pump, it is essential to pay attention to the minute details in all the steps involved. First, the correct bearings per the pump model must be obtained. Typical sizes include 6204 bearings and 6304 bearings, but this should always be validated against the manufacturer’s specifications. Before replacing the bearings, always prepare all necessary tools, including a bearing press, bearing puller, and an alignment dial indicator.
Starting from the bearing size, filling in the gap with the type should be satisfactory; for instance, if the size was 6203 and 6204 and checks for further degree of fitting, compatibility with the waterway is a must
Check the seating tolerances to ensure the friction bearing within the housing measures 0.02 mm to 0.05mm. Dramatic changes in these numbers can lead to severe issues down the line
measure the radial play utilizing a dial gauge center or tick the radial play outmaneuvers the 0.003″ mark. Ideally, it shouldn’t even reach 0.02 or 0.08 mm alteration as that will shake and increase wear
Do keep a shaft alignment accuracy within ±0.001″ or ±0.025 mm. The bearings gon’ get the intensity if you ain’t being rigid
make sure that the replacement bearings work in a wet environment by waterproofing them, or else the bearings won’t get the lubrication they need to function properly
Always remember those guidelines as mentioned above and concrete the strategy, making sure to give attention to detail and precision so that the replacement bearings deliver relief to the waterway pump as they go along for numerous uses.
Aqua-Flo pump bearing replacement: Tips and tricks
Of course! Here is a succinct response for Aqua-Flo for queries concerning pump bearing replacement with relevant technical parameters in fitment selection:
Justification of Alignment Accuracy: I suggest that the alignment limits be kept within the range of ±0.001” (0.025mm). These parameters should not be exceeded as it will cause uneven stress on the bearings. Misalignment directly affects the equipment’s bearing life, wear, and vibration.
Bearing Lubrication: The manufacturer has advised procuring waterproof and high-strength grease, which will be imperative. Watertight grease guarantees performance in moist conditions while limiting moisture ingress, which can undermine the bearings’ lubrication and possibly result in bearing breakage. Always check the manufacturer’s recommendations for approved and compatible products.
If these parameters are followed and the alignment is performed with proper instruments, the Aqua-Flo pump bearings should last a long time, operate effectively, and be reliable.
LX pump bearing replacement: Special considerations
The LX pump bearing replacement process requires a critical appraisal of a few factors for accuracy and durability. First, ensuring the bearing shaft’s tolerance is within the range of 0.001” negative 0.001” (0.025mm) is crucial to avoid misalignment, which might affect the pump’s functionality. Further, I thoroughly checked the bearing seat to confirm it is free from dirt and other contamination and does not show signs of wear, which would interfere with the correct positioning of the new bearing.
Following the manufacturer’s directions, I apply a special grease, usually waterproof and high-temperature grease, to enable the pump to function correctly in a moist and high-temperature area. These lubrication options are essential because LX pumps will likely operate under different conditions.
If rotational speed or load capacity are limitations for bearing design and characteristics, I will ensure that I have the bearing specifications to check for compatibility. To illustrate, for the optimal use of LX pump bearings, it is mandatory that their RPM rating be considerably high (above 3400 RPM). This attention to detail makes for a smooth process of bearing replacement.
How can I extend the life of my new hot tub pump bearings?

Proper maintenance routines: Keeping your bearings in top shape
I adhere to a regular maintenance schedule and take note of the following points to keep my hot tub pump bearings in operational order.
Lubrication: It is also imperative to reduce friction and wear (on the surfaces) by ensuring that the bearings are very well lubricated. I use water-resistant greases intended for high-speed usage, especially for the pump, which can exceed 3400 RPM. This level of lubrication is necessary to meet the system’s requirements.
Alignment: The pump shaft alignment is constantly checked to avoid unnecessary forces on the bearings. Lack of alignment can cause uneven force distribution in the bearing and would cause its failure at an earlier stage than expected.
Monitoring Load Capacity: Hot tub pumps are known to work under a load most of the time. I check that the bearings I am about to work with are rated at a load equal to the load created by the water system’s average pressure and flow dynamics.
Sealing and Protection: To avoid damage from water or dirt, I apply seals around the bearings and ensure they do not leak. This is particularly vital in a warm and pressurized atmosphere like that in hot tubs.
According to my approach, maintaining such practices and complying with technical requirements would allow me to greatly enhance the longevity of my hot tub pump bearings and ensure that they operate satisfactorily.
Water chemistry management: How it affects bearing longevity
Water chemistry has a significant influence on the durability of hot tub pump bearings. Not controlling the pH, alkalinity, and calcium hardness levels specifically affects the bearing condition. If the water chemistry is incorrect, there is a risk of either corrosion or scale formation, which will undoubtedly lead to damaging or wearing the bearings. The main parameters that I consider when I am looking after the bearings are as follows:
pH Levels (7.2-7.8): I maintain this as I do not want water to be too acidic or too alkaline, which is harsh on metal components such as bearings.
Total Alkalinity (80-120 ppm): Both high and low alkalinity is harmful to the system, by remaining within the boundaries of these numbers the pH level can be maintained avoiding drastic changes.
Calcium Hardness (150-250 ppm): This prevents the insides of the pump from forming scaling, removing unnecessary pressure from the bearings and allowing them to be free to rotate.
Continuously monitoring and controlling these parameters will allow the effective functioning of the bearings, which will enhance the pumps’ efficiency and stability while increasing the pump’s lifetime operation. Also, to ensure that I am constantly managing water chemistry, I use hot tub test kits and chemicals.
Regular inspections: Catching issues before they become significant problems
A regular inspection program can assist in alleviating proper problems forever. To test the system properly, I do the following:
Bearings and Pump Noise: Any strange sounds like scratches, stone or metal rubbing against each other, or any grinding sounds sometimes do exist, but I have to refer to that as foster for which my bearing might be loose or not where it is supposed to be. If these sounds are heard, it is said that the pump bearing will have to be replaced to have a sturdy structure, which will not ultimately lead to pump breakdown.
Seal Integrity: I ensure that the pump seals do not fail; if there are any failures, there’s no leakage to be witnessed. Thus, the presence of water around seals might indicate a decaying seal, and such would require replacement so that the entire structure works properly while preventing any water build-up.
Electrical Components: I examine the wires’ connections to ensure they’re properly made and uninterrupted by damage or corrosion. According to the pump’s make, an electrical supply tester would ascertain the voltage required for pumping with normal ranges between 120V and 240V.
Flow Rate and Pressure Readings: To check the flow rate and extent of pressure, there exists a norm whereby I direct a pressure gauge over the range within which the manufacturer specifically stated (in the instance of flow rate: 40 to 80 GPM for residential systems). Non-compliance in any situation is against the ideal specifications as it may suggest better solutions, such as unclogging some barriers.
Otherwise, adhering to the pump’s maintenance schedule and using appropriate equipment allows me to keep the pump in good working order and foresee troubles, reducing the overall time the pump is not running and the expenditure on repairs.
What are common mistakes to avoid during hot tub pump bearing replacement?
Improper alignment: Why it’s crucial to get it right
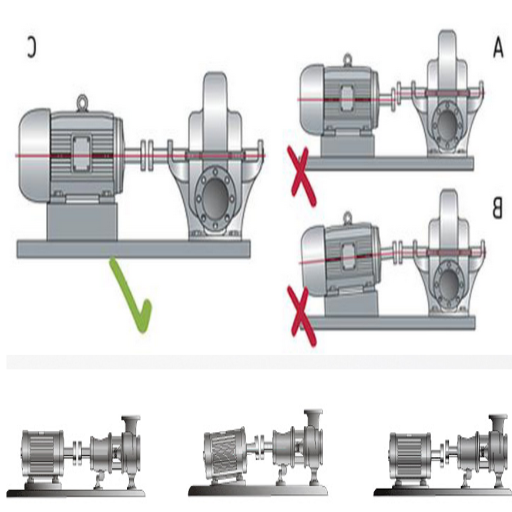
Here is my response: I always avoid poor alignment throughout the replacement of hot tub pump bearings since these may lead to significant misalignments that will have catastrophic implications. The misalignment between the motor shaft and the pump shaft forces the bearings to bear considerable strain, leading to their degradation and, in some incidents, their destruction. To ensure the alignment is correct and the warm tub pumps are not misaligned, I make sure to confirm the following checkpoints:
Shaft Tolerance: I confirm if the motor and pump shafts are within a 0.005-inch tolerance of being parallel; this helps prevent excessive friction and vibration.
Coupling Alignment: I use a straight edge, and feelers gauge to confirm that coupling faces are standard and that all gaps are even on all edges. If there happens to be any gap outside the percent prescribed by the manufacturer, 0.002 – 0.004 inches, it is rectified immediately.
Angular and Parallel Alignment: I pull out dial indicators to check for parallel and angular alignment to ascertain that the shafts have been centralized and, as such, placed under lesser stress than they would otherwise endure.
Investing effort on the alignment work not only improves the lifespan of the new hot tub bearing by reducing the overall stress and prevents overheating, it also means the pump can sustain smooth operation while minimizing unnecessary delays where there is no need for the hot tub to pump.
Using the wrong tools: How it can damage your pump and bearings
With the understanding I’ve gained through practical experience, it is apparent that pump maintenance can turn dire if the incorrect set of tools is utilized. To a large extent, the scenarios mentioned earlier can be evaded with the correct set of tools. For instance, rather than utilising a standard torque wrench to tighten nuts and bolts, it would be more reasonable to use calibrated ones, this way, unnecessary stress will not be placed on the pump’s housing or bearings. Using visual means to align shafts, such as sighting, instead of measurement instruments, such as dial indicators and laser alignment devices, will only place a pump in the heat of vibrations and lead to excess wear and even breakdown. Machine lubrication engineers are well-trained and experienced in the science of maintenance tasks, and these are the most common parameters to follow when performing maintenance tasks.
Shaft Alignment Tolerance: To align shafts within a tolerance of 0.005 inches to each other, the shafts should be aligned using PP106 dial indicators or laser alignment devices, which remove uncertainties with ranges.
Coupling Alignment: The minimum spacer thickness can be set equal to 0.002 inches or the maximum – 0.004 inches where appropriate tools like straight edges and feeler gauges are required to obtain as tight of a fit as feasible while machining components.
Torque Specifications: A torque wrench can set the pressure to overlay the head over a fastener, guaranteeing that the upper limit of the pressure necessary to tighten it is not exceeded.
As an engineer, I appreciate the importance of detail and proper tools, which can significantly reduce unnecessary expenditures. I can protect the pump from damage by following the abovementioned parameters and using relevant tools.
Compared to the acceptably low level of investment, considerable costs incurred due to poor maintenance practices, downtime, or even repairs are avoided.
Neglecting to replace the seal: The importance of a complete job
Assuming the winch seal is good enough without replacement during routine operations, it can potentially torch major operational problems with high maintenance costs in the long run. Also, I often find that these old or damaged seals tend to leak, causing pressure loss or even damaging the entire equipment. In my opinion, seals are one of the most critical components in the pump because they help in protecting the whole system. Not replacing the seals puts risk into the effectiveness of the pump itself. Whenever I change seals, I always ensure that they meet the manufacturer’s requirements, including the type of fibers and operational efficiency. Here’s what the washers look like, and I assume the seniors also have them:
Seal Material: This involves ensuring that the seal material (for example, Buna-N in general oil operations) is chemically and thermally compatible with the fluid to prevent corrosion.
Seal Face Flatness: Hence, considering a sealed face with a flatness tolerance not exceeding 2-3 helium light bands during inspection to prevent over 2.5band pressure range would suffice to eliminate fluid leakage.
Spring Tension and Alignment: Improper external forces on springs can affect the pressure and tension on the sealing faces, thus causing wear and distorting forces after the seal loses tension, enabling dissolution.
Assembly Torque: Certain torque ranges are recommended, and I use these ranges while carefully installing the components to ensure that I don’t over or under-tighten the bolts.
By meeting those requirements and changing the seal when necessary, I ensure that the pump can be used without failure and that malfunctioning parts will not reappear. While omitting this step saves time, it leads to more significant repair expenses and waiting time in the long run.
Frequently Asked Questions (FAQs)
Q: How can I tell I must replace my hot tub pump bearings?
A: You can identify this with the loud noise from the pump and leaky seals around the pump. Other signs include vibration in the pump and reduced water flow in the tub. If you observe any of these issues, it’s about time you start thinking about replacing the bearings in your hot tub pump.
Q: Can I replace the hot tub pump bearings or contact an expert?
A: You can, but if you’re uncertain, it’s strongly recommended that you contact a specialized professional. Doing so would result in improper fitting of the bearings, leading to further potentially harmful issues within the tub.
Q: What must I do to replace a hot tub pump bearing?
A: To perform the procedure, you will need super-duty silicone lubricant, a screwdriver, a wrench, and a bearing puller. You also need a seal and bearing kit. When you get everything, ensure the seal and bearings match your spa model.
Q: How often should hot tub pump bearings be replaced?
A: When it comes to pump bearings, replacing them every 3 to 5 years is common. The bearings can survive longer with proper care and suitable water conditions. Especially if you see any sign of degradation or notice the bearings are not working as they should, it’s best to swap them out.
Q: What’s the difference between front and rear bearings in a hot tub pump?
A: Among both rear and front bearings, the rear one is located close to the motor, and the other is close to the wet end of the pump; however, there is a likelihood that the front bearing may come in contact with water. Although both rear and front bearings play an absolute role in enabling the pump’s appropriate functioning, the front bearing tends to fail first due to frontal exposure to water.
Q: How would I replace the hot tub pump bearing to ensure proper alignment?
A: Proper alignment is essential for efficient pump operation. When reassembling the pump, adjust all components, such as the shaft, impeller, and bearings, so they are in one place. Use the old bearings to locate new ones.
Q: Are there reputable companies who deal with hot tub pump bearings on a win-win business deal?
A: Hot tub pump bearings can be bought at pleasure craft bearing suppliers, bearing shops, or even from the pump manufacturers. They should be specific about the type of hot tub and make. Some well-known brands sell ready-to-use seal and bearing kits for easy replacement.
Q: How should my new hot tub pump bearings be placed to ensure long life?
A: Some time now and then is sufficient to allow standard bearings to rest. Hot tub water chemistry must be maintained balance, detergent should be used for a good pump soak, ventilation should be adequate, and noise or vibration issues should be reported. Ideally, Maintenance of your spa hot tub can greatly increase the lifespan of all components of the hot tub spa whirlpool, including the pump bearing.