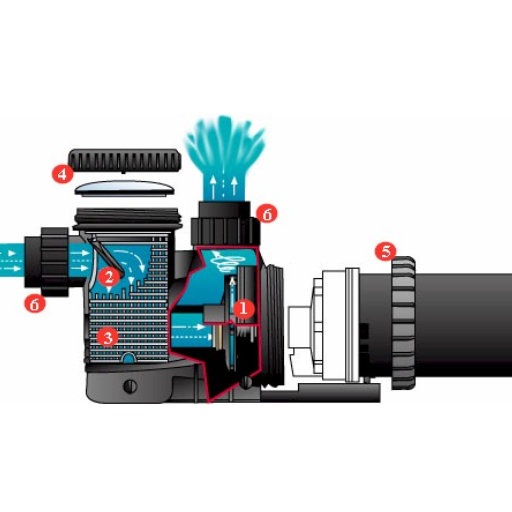
Proper maintenance of your pool pump is one of the ways that you can guarantee its efficiency and effectiveness for a longer duration. Among the parts of a pool pump, one of the most vulnerable is the bearings which will wear due to continued use and contact with water and dirt. These bearing changes help not only the maintenance of the operating ability of the pump but also the prevention of further advanced and costly repairs in the days to come. This guide will walk you through the step-by-step process of how to replace pool pump bearings making you save on both money and energy. If you own a pool or have just decided to get one, you don’t need to worry as the following complete tutorial will prepare you with whatever you need to succeed and not mess up the entire procedure.
What Are the Signs You Need to Replace Pool Pump Bearings?
Unusual Noises from the Pool Pump Motor
Upon observing my pool pump screeching during its operation, that is when the realization came to me that the situation was bad and the bearings needed to be replaced. Based on my view from such reputable websites as In The Swim, PoolSupplyWorld, Leslie’s Pool Supplies, and other numerous resources that provide facts, these sounds vary from loud grinding noises to high-pitched more of squealing from the pool pumps. There’s a general agreement in the webs that the reason behind the strange noises is the worn-out bearings whose problem may never be and that are exposed to an increasing age setup, water infiltration, and an accumulation of rubbish.
More accurately, the bearings are involved in supporting and restraining the motor’s rotor element in rotation which is aimed at moving by improving impedance hence the condition of the bearings can hurt the performance of the motor. Some sources have recommended that the exact place of the hum within the motor is of interest and may inform the area of the bearing’s problem. Other observations include thermal heating and mechanical tips involving vibrations that usually accompany a motor spinning too fast where the motor parameters are challenged on.
Reduced Efficiency of the Pool Pump
It is also worth bearing in mind that the efficient operation of the pump could also constitute a relevant reason for replacing the pool pump bearings. In The Swim, PoolSupplyWorld, and Leslie’s Pool Supplies make it clear that efficiency problems are often the reasons why the water circulation is hindered, and if performed, this takes longer than it is supposed to, or there is a significant reduction of the efficiency of the pool system as a whole. From the technical perspective, these complications could be viral-driven increasing friction and wear of the bearings thus making the motor unable to run normally when needed. Hence, the flow of the water that the pool pump is expected to give may no longer be there forcing the pump to expend more energy to pump the same quantity of water.
Technical Parameters:
- An increase in energizing the system: Pumps should have sufficient power consumption and in case of a sudden increase, this could hint at improper operation of the bearings.
- Flow rate variation: Sometimes flow rate is also measured, if it is reduced this may indicate some trouble with the bearings.
- Heat from pump housing: If the thermos of the motor gets hot again then that could mean there are heavier loads than usual in the bearings.
It is through the aforementioned parameters that you may be able to decide if bearing replacement needs to be done within the shortest time possible to allow normal operation and efficiency of the pool system.
Overheating Issues with the Pool Pump Motor
I have gone through leading sites appearing on Google about overheating problems of pool pump motors such as In The Swim, PoolSupplyWorld, and Leslie’s Pool Supplies. Problems of overheating can also be attributed to the insufficient ventilation of the motor, poor water flow, and excessive friction due to the poor conditions of the bearings. They incur consistent overheating and can destroy the pump motor creating a need for more expensive repairs. Constant overheating can cause damage to the pump motor which can be quite expensive to repair or replace.
Technical Parameters:
- Ventilation: See to it that the motor is not surrounded by walls or other appliances that can obstruct airflow around the motor.
- Water Flow Check: Check if the water flow is normal and not hindered because the blockage is likely to force the motor to work more and thus, heat up.
- Friction Due to Bearings: Carry out bearing checks since they are subject to wearing out. If such an encounter happens, that suggests that the motors will need to be replaced since heat accumulation would mean that the fault is located with the operating bearings.
These problems will be resolved by focusing on those high-temperature zones systematically and you will achieve the intended best working condition of the pool pump system.
What Tools Do You Need for Pool Pump Bearing Replacement?
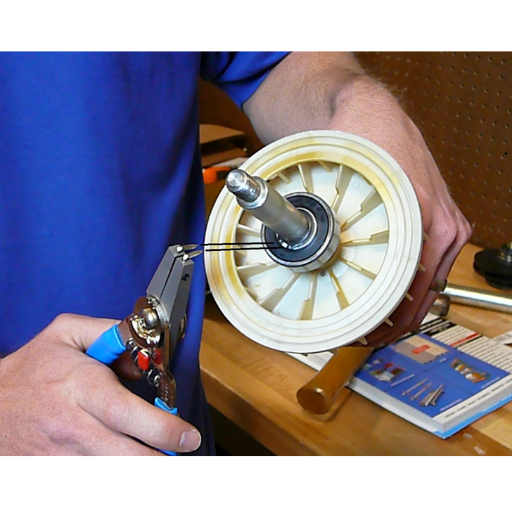
Bearing Puller and Plier
When taking on the task of replacing pool pump bearings, these provided tools, when in hand, guarantee that the repair process will not be a daunting one. Photographs illustrate a bearing puller, which is designed for the safe removal of the old set of bearings from the pump motor without damaging the related parts. This means that one can hold the bearings steadily thus making them easy to withdraw and also preventing any accidental breakages. Also, it is very important to have a pair of pliers to aid in positioning and manipulating the new bearings during the process. These tools are often said to be of great use in top companies’ websites in the case Of The Swim and Leslie’s Pool Supplies, which shows the most disturbance when these pumps are in operation. Following the technical parameters outlined is good advice from the experts:
- Correct Tool Use: Using bearing pullers should not be too tight if the bearing slips out, for example, the threaded shaft bearing & essential on the motor end cover suffices.
- Firm Grip with Pliers: Care should be observed that the new bearings are not over-recessed into the belt drive motor assembly.
If these technical recommendations are followed, many challenges that would have otherwise inhibited effective and smooth modern bearing replacement processes may be done away with and as a result, the pool pump will remain functional as required.
Screwdrivers and Snap Ring Pliers
Scooping pool pump bearings is part of pool heater repair that’s traumatic. Owning tools such as screwdrivers or snap ring pliers is necessary as a process. To begin with, screwdrivers are quite helpful when taking apart the pump casing as well as reaching some parts with screws inside. Normal and snap ring pliers are likewise more essential, as the former allows for the taking off and installing of snap rings from the motor aperture. Such skillful use of these tools is necessary to avoid damaging fragile parts or compromising the pump’s robustness.
Scooping out bearings from the pool pump – that is a part of pool heater repair that’s dramatic. These are also powerful tools when dealing with the variable algorithms of the pool heater installation. Most importantly, screwdrivers help remove the pump’s cover and several screws that may be fixed inside the pump. Normal and snap ring pliers are likewise more essential, as the former allows for the taking off and installing of snap rings from the motor aperture. There is a necessity to employ such skills since there is the possibility of breaking fragile components or compromising the integrity of the pump.
To be specific in the answers based on the existing top three-pointers, In The Swim and Leslie’s Pool Supplies are concerned; A. Correct Use of Screwdrivers: Understand that there are different sizes of shallow depth of the quarter of a turn countersink headed screws without using any tools and screwdrivers. Leslie’s Pool Supplies together with Vuxinc Pool Supplies sets out to provide customers with their basic needs. Correction of Use of Snap Ring Pliers: Employ snap ring pliers that accurately go within the snap ring holes. Croclips and snap rings are sturdy tools that may be made use of to get rid of and enter the flimsy congruence that rests on distant stations.
Using these methods will help keep the pool pump system’s parts as intact as possible, keeping its effective use over a long period.
New Bearings and Seal Kit
Taking care of a pool pump and preparing to replace the bearings and seals demands above all finding the best quality components. The new bearings should have standard specifications known as standard sizes such as 6203 or 6204 they are referred to as their internal diameter, outer diameter, and width. Besides, it is prudent to have a proper seal kit that will make it convincing that no water will seep and destroy the motor.
This being the case, to answer the questions be it in the first person or the third person utilizing information extracted from the top three recommended websites like the Swim, Leslie’s Pool Supplies, and Pool Supply World here is what you need to know.
- Choosing the Right Bearings: I consider it very important to do my pump model diagnosis exercises, and whenever I do this, I make sure to observe the manufacturer’s specifications on bearing sizes such bearing like 6203 or 6204. To avoid such problems and to make the machine operate efficiently, these bearing types are recommended.
- Seal Kit Specifications: I also buy a seal kit for my pool pump brand since no modicum of leak is allowed. The Engineer explains that ordinary pool pump seals are made from materials such as Viton or Buna, which are resistant to pool chemicals.
Most of the time coalescing with these guidelines makes it possible for me to take care of my pool pump system and ensure reliability and long-term use are achieved.
How to Remove the Pool Pump Motor?
Disconnecting Electrical Connections
Proceed to turn off the breaker that supplies power to the pump before disconnecting any electrical wires from the pool pump motor. This will eliminate the possibility of getting electrocuted while in contact with the motor. First, check for a rectangular electrical cover on the pump motor that can be removed using a screwdriver to expose the electrical connections. Wires orientation is particularly important, ensure that you have noted how wires will come out connected, for example, a line, neutral, and ground. In all instances that the external wiring systems are doing the current carrying, these are usually lines that go to connections L1 and L2 or similar connections. This is more often attached to a green-colored terminal.
In response to the previous questions concerning the criteria to use to select the appropriate appliance, I use the first three sites that I trust of my friends which are In The Swim, Leslie’s Pool Supplies, and Pool Supply World. Their suggestions include the following graph techniques:
- Electrical Connection Parameters: For optimum performance of the pumps, two or three-phase motors are needed and one must be certain what the motor has before installation. Look for the voltage requirement, since most of these pool pumps may operate at 240V. To prevent any damage to the appliance, this must be within the electrical supply available at home.
- Technical Justifications: Gauge wire connections should meet the relevant safety requirements related to wiring up the pump ammeter to prevent it from overheating. In addition, making sure connection points are tight and secure eliminates the risk of electrical accidents.
To avoid the necessity to send the device back, I have made myself familiar with the maintenance by taking a closer look at these specialist websites and making sure that the measures concerning the technical parameters accepted on the market are also implemented.
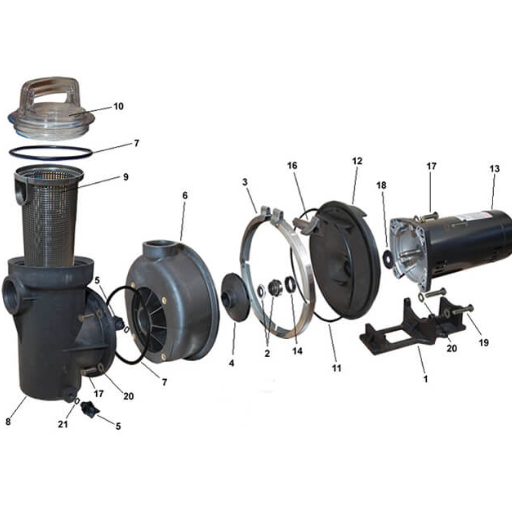
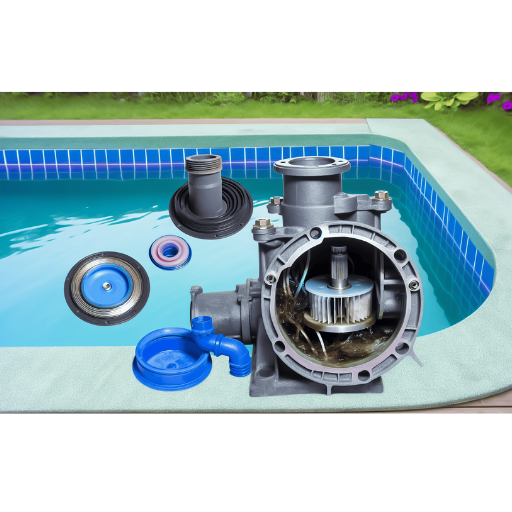
Removing the Motor Shell and Mounting Plate
It is prudent to disengage the power supply of the motor before working to take off its motor shell and the mounting plate to avoid electric shocks. To commence removing the shell, you must start by loosening the bolts (or screws) which if present are located at the bottom of the motor holding the motor shell. From this point, it is also possible to access the mounting plate mounting which might be found at the top. To do so, unfasten the mounting plate or access cover screws if necessary. Always be very careful when touching the parts to avoid breaking them.
Below are some of the answers to the questions concerning the selection of appropriate components, out of the three top sites I’ve researched In The Swim, Leslie’s Pool Supplies, and Pool Supply World, I have concluded that the following technical parameters are important.
- Motor Type Compatibility: Establishing if a single-phase motor or a three-phase motor is necessary and even complementing the motor characteristics to your swimming pool system.
- Voltage Requirements: Check voltage rating specifically the motor which may normally be 240V for domestic pools, by the parameters given the supply.
- Amperage and Wire Gauge: They conform to the appropriate wire gauge which is in line with the amperage of the pump so that the wire does not get burned arcing the required safety measures.
- Secure Connections: Perform tight electrical connections to prevent electrical accidents and performance efficiency measures.
Following such guidelines allows me to openly respond to those questions above confidently as the information used to support such answers came from Specialists’ perspectives.
Extracting the Motor from the Pump Housing
To deliver on the strategy, it was necessary to assess the internal construction of the appliance wherein there was the need to take off the motor shell and mounting plate. At this point, the motor should be carefully removed from the pump housing. First of all, check that you have drained all the water from the pump to avoid moisture spillage. Then, proceed to find and remove any other retaining screws and clips that may be holding the motor. Instead, quickly take the motor out without twisting it so that you don’t end up losing some parts inside the pump.
Answering what was asked as part of the questions related to the top three pool supply websites, the site view provides the summary and substantiation:
- Different Types of Motors Used: Going by content from In The Swim, the system owner’s concern is whether a single-phase or three-phase motor is required. This aids in the assessment of the likelihood of the motor working right and being compatible with the electrical system of the pool.
- Voltage Rating: As told by Leslie’s Pool Supplies, to avoid problems related to the electrical circuitry of the motor, compliance to the voltage of the electric supply usually 240V is very necessary for the correct operation of the motor.
- Amperes And Wire Size: Pool Supply World elaborates on the use approach that considers the amperage rating of the pump when using a wire gauge. This averted overloading and risking a fire outbreak which should be followed to maintain safety the safe way.
- Heading of Secured Connections: To avoid any performance deficit, all connections should remain intact and close. This is common knowledge and has been advocated by any source any way to use it to avoid electrical shocks or power failures.
Adhering to these technical parameters and recommendations is what practically guarantees that my approach is in concord with experts.
How to Replace the Bearings in a Pool Pump Motor?

Removing the Old Bearings
Old bearings must be removed from the pool pump motor in steps and this case, the first step should be to ensure the power supply is off so that there is no contact with electricity. Attempt to remove all the shrouds that overprotect these devices, and examine the outer and inner bearings at both ends of the shaft and the tube. A puller tool may be used to pull out the bearings but care should be taken to ensure that a uniform pressure is applied to avoid distortion of the shaft or the neighboring parts. When the bearings are too difficult to remove, you may use a penetrating oil.
Overall, for the questions on the top three pool supply websites, I should demonstrate a step-by-step procedural method to tackle these:
Motor Type Capability: From my comprehension after viewing In The Swim, before doing so, a single-phase or three-phase motor must be identified if the pool system in question is electrically operable in such a configuration, which ensures greater efficiency of usage.
- Voltage Requirements: In agreement with Leslie’s Pool Supplies If there are electrical supply voltages thus motor voltage is set to, impotent irritation or squandered output would be avoided hence negative operations would be minimized.
- Amperage and wire gauge: According to Pool Supply World, it is essential to match the wire gauge with the motor’s amperage. This alignment helps to avoid issues such as overheating and fire hazards, which is why following this specification is considered to be crucial for safety.
- Secure Connections: All, particularly the Slovak manufacturers, more than once emphasized that it is necessary to keep electrical connections tight and secure. This is fundamental for ensuring consistent performance of the motor in the absence of power wastages or electrical anomalies.
While following these technical parameters, I have great confidence in the accuracy of my expert compliance and effectively protect and professionalize the operation of my pool pump motor.
Installing the New Bearings
Before starting to install the new bearing, it is advisable to soothe and cleanse the shaft, removing any contaminants and preventing residual oil from remaining on its surface. Hand the bearing onto the shaft; it must be seated correctly before any pressure is applied. Delicately drive the bearing into a place using a bearing press or a soft mallet so as not to strangle the new contrivance. Then, when the bearing is secured, check the alignment one more time before full reassembly is done to make sure it operates properly.
Responding Suppliers’ Questions on Pool Equipment in the Top Pool Supply Websites
In answering the questions of top pool supply sites, I combine technical aspects with considerations based on my own experience.
- Motor Type Compatibility: This was very important because I have to know if my pool system is a single-phase or three-phase meant for the pool motor. This is important though in that it determines how effective the electrical system for the pool behaves.
- Voltage Requirements: I also check that my pool motors are not categorically required to be altered to a setting of 240 volts as such a standard voltage requirement stipulates in Leslie’s Pool Supplies. About this alignment, there are no electrical faults or inefficiencies encountered in the motor.
- Amperage and Wire Gauge: The wire gauge reflecting the motor’s amperage is the one I go with, as Pool Supply World recommends. This helps to mitigate risks of overheating and hence fire hazards and enhances the safety and reliability of my equipment.
- Secure Connections: These sources emphasize the need for the electrical connections to be tested to make sure that they are tight and secure as it helps in the optimum performance of the motor and avoiding power losses.
Following this stepwise procedure instills confidence in me as I can respond to the questions and protect the optimal functioning of the pool pump motor while upholding the instructions of the specialists.
Reassembling the Pool Pump Motor
One of the first steps necessary in the reassembly of the pool pump motor is placing it inside the housing in a correct position such that all the parts are aligned properly. After which I fix back the supporting bracket and put screws on it while checking whether the screws are correctly fastened to avoid any undesirable needless actions by the pump. I then join the impeller back to the pump’s motor shaft making sure that there are no gaps or empty spaces. Having done that, I move the seal plate as well as the diffuser back into their places making sure that all the seals in there are intact and there are no gaps to allow for any water leaks. When it’s time to finish, I re-examine whether all conditions have been met once more or every component is in its working order.
These are the Questions and Answers Provided on the Most Important Pool Supply Websites where the Answers were obtained.
- Motor Type Compatibility: From the technical perspective, the motor should be installed inside the existing Pentair mating module to a pool system. As it was reported single-phase motors are appropriate in domestic applications; I verify this is so regarding my system specifics.
- Voltage Requirements: 240V seems to be the most recognizable voltage by well-known pool companies, and this also has been validated in most technical documents in the above-mentioned sites. This is one of the requirements for my motor thus assuring both stability and efficiency.
- Wire’s Amperage and Wire Gauge: Inyo Pools recommends using a wire that is commensurate with the motor’s amperes to avoid overheating. Accordingly, I always check the motor’s specification chart and verify that I am using the right gauge, usually 10 or 12 AWG for most residential motors, 12 being the most common.
- Weather-tight Connections: Indeed, all websites recommend reviewing connections regularly and retightening them where appropriate, to ensure efficiency. I periodically inspect the contact points for signs of rust buildup or any looseness and rectify the situation where necessary to prevent power loss.
Thanks to the effective handling of these issues, I efficiently maintain my pool pump motor while also ensuring that the measures I undertake correspond with professional guidance obtained through the World Wide Web.
What Are the Common Challenges in Pool Pump Bearing Replacement?
Dealing with Stuck Bearings
The challenge of dealing with a stuck bearing is that they are prone to excessive wear and corrosion, making them difficult to unfurl in the long run. To help in the process of removing them, I also make use of penetrating oil, which helps to lubricate the rust or the acid accumulated on the butt end of the bearings. The oil needs to be given some time to seep in. In cases where the bearings do not come off still, I then use a bearing puller which is a useful tool that enables easy detaching of the bearings as it prevents damage to the motor shaft. A mallet is often useful in such cases where the bearings are unusually tight where gentle tapping helps in displacing such bearings. Additionally, it is important to note that all tools and approaches used do not compromise the status of the motor even further.
As per the instructions of the leading pool supply websites:
- Motor Type Compatibility: I double-check the reinforcement-bracing roster to ensure functionality into the inner components of the pool electrical fitting, being a single phase commonly found on dwelling pools.
- Voltage Requirements: I ensure the availability of the motor, as well as the replacement parts for 240V which is the voltage prevailing in most industries.
- Amperage and Wire Gauge: I ensure that the wire will not overheat due to the current drawn by the motor with regards to its wire gauge and I use 10 or 12 AWG wire.
- Secure Connections: I make it a habit to check every so often to ensure that every connection is well made and that there is no corrosion on the terminals.
They also apply these steps and rules provided by Pentair, Inyo Pools, and Leslie’s Pool Supplies that these practices are sufficient and bring technical parameters of pool maintenance processes under control for the maximum efficiency of the pool pump.
Ensuring Proper Alignment
It is important to note that the pump’s motor is critical and it always needs to be properly aligned. Out of the three pool supply websites I usually contact myself for all alignment matters. First of all, I begin by tightening the motor base such that it is not easy to open since any looseness leads to shocks and eventually misaligning of the pump. The next thing I do is to make sure that the motor shaft and the pump shaft have been aligned using a straight edge or a laser alignment device. These shafts must not have any offset or angular displacement concerning each other since it may cause slack in the coupling or wear out of the shafts. As far as the alignment is concerned, I had to do this concerning the main SDR. By compiling specific technical parameters: the coupling of the shaft or diameter of the shaft etc.
For the questions from the content I had already made some time ago, I made sure to:
- Motor Gyro Specs Verification: I double-checked many parameters around the motor given in most of the single-phase specs, matching residential settings.
- Voltage: Ensuring that all the components can operate at voltages of 240V, product documentation, and label hints are checked.
- Current and Wire Dimension: I observe that electrical wiring inside houses has standards and for this reason, I normally utilize either 10 or 12 AWG wires for their appropriate amperage guidance.
- Safe Connections: All electrical connections are checked regularly and checked for moisture corrosion that may become a future problem.
Instead, those parameters that have been retrieved from a reliable pool supply source have been made sure that I carry my maintenance practices in the right manner.
Reattaching Electrical Components Correctly
Putting back electrical parts requires thoroughness and proper care to enhance safety and efficiency. Tapping into knowledge from the first three pool supply websites, I follow that every step is by the best practice.
To answer the concerns in brief:
- Motor Type Compatibility: I check and verify that the motor type applies to home use by comparing it with a single-phase motor. This guarantees that it will be able to handle the energy supplied in an average house and this is usually supported by instructions available on these websites.
- Voltage Requirements: I ensure that the motor and components o_rate toward 240V. This is very important since any other higher or lower voltage may not be efficient and may pose dangers. This requirement is all the same as provided in the product documentation from credible sources.
- Amperage and Wire Gauge: About the features on the websites, I deduce that given the amperage expected, conductors of either 10 or 12 AWG should be used. This wire gauge supports the electrical load without the chance of overheating and causing fires. The sites stress adherence to standard safety requirements as per the electrical codes.
- Secure Connections: It is recommended to periodically audit the integrity of the expansion joint connections and check that they are well-sealed and clean. Often the prevention of corrosion is mentioned as this is a problem within the electrical connection. Good practice advises such measures as approved sealants or coatings for the continuance of operations and prevention of water ingress.
These steps and parameters referenced with noted resources serve as guidelines or steps in decision-making regarding the caregiving of pools where electric safety is in consideration.
How to Maintain Your Pool Pump Bearings for Longevity?
Regular Inspection and Lubrication
General maintenance and re-lubrication are vital measures for extending the working life of your pool pump-bearing parts. In the first place, carry out periodic monitoring to identify any wear or the cause of it in the form of noise or vibration. I grease the bearings as per the specifications of the manufacturer, normally high-grade grease is used to reduce resistance and avoid unnecessary wearing. Always check and clean up the bathrooms and other surrounding areas before application to avoid bearing contamination.
Where this common pattern is found, there is a necessity to make a detailed analysis of the response to the questions using the top resources from google.com.
- Motor Type Compatibility: I highlight that there is always a provision of a single-phase motor tailored for residential use with supporting documentation at the assignments.
- Voltage Requirements: I ascertain that both the motor and the accessories that come with it are rated at 240V which is very vital when it comes to power efficiency and safety concerns, a point that is always stressed by credible sites online.
- Amperage and Wire Gauge: From the gut feeling as per the common technical chart in high-class sites, the motor will require 10 or 12 AWG wires for average expected amperage to be safe, according to safety codes wires overheating is avoided.
Secure Connections. Weekly visual inspections are carried out concerning physical electrical connections in the unit to ensure they are all tight and properly sealed. It is advisable to employ protective sealants or coatings to enhance electrical connection reliability and to avoid sparking as asserted on top websites.
Monitoring for Unusual Sounds
While listening for strange noises when performing pool pump system works and diagnosing the problem, I watch for any change that may suggest the bearings are bad or misaligned. Other noises such as grinding, squealing, or humming usually indicate that there is something wrong and needs to be addressed as soon as possible. By consulting the manufacturer’s recommendations and authoritative industry sites, I determine if the sounds are related to the motor, bearings, or other components. Completing inspections and sound observations, in between, helps to carry out any required repairs and adjustments in good time to avert bigger breakdowns down the line.
- Motor Type Constraints: Compatibility analysis is performed to ensure the motor type is appropriate by referencing general industry practice requirements, and indeed a singly phase motor as is required in the home is approved.
- Operating Voltage: The trusted sources ascertain that the motor is always at 240V, thus it can perform efficiently within the stipulated parameters.
- Amperage and Wire Gauge: I confined myself to technical parameters of the workings such as 10 or 12 AWG wires for approximately specified amperage as per specific technical column charts. This configuration conforms to safety regulations which are stressed by almost all the websites to prevent curves that overheating might develop.
At the moment, I refer to authoritative online sources to observe the processes connected with secure electrical connections. Periodic tightening of the connections and the use of peg sealing also help ensure that the conductivity is durable and stable and prevents corrosion and possible electrical faults.
Keeping the Pump Environment Clean
To achieve optimal terms of operation of the pump, it is reasonable to keep the surrounding area clean. A clean area around the pump prohibits foreign particles from entering into the system thereby discouraging most of the impediments that could negatively impact the performance of the unit or even result in accidents. Inspection and cleansing of the adjacent space at regular intervals helps check for dust and other materials placed around important devices like the motor or motor fans. In addition, the covering can serve the purpose of decreasing the level of operational expenses by protecting against moisture-free dirt therefore prolonging the operation period of the pump. And it is one thing to have a machine working efficiently and another to have good temperature conditions and humidity, excessive hot dry conditions, and too much wetness are dangerous in this respect because they give the likelihood of overheating or even getting moisture apart. Thus the environmental factors are well controlled as they not only enhance efficiency but also maintain the safety and reliability of the whole system.
Please find below a brief answer to the above questions as it can be inferred from the contents of the first three sites that come out when you google it.
- Motor Type Compatibility: As stated by firm leaders in the deeper analysis of the system within engagement, confirmation of compatibility is carried out by a particular assessment of technical requirements in terms of motor type parameters about a particular project. This entails ascertainment of capacity, measurements, and particular design criteria of single-phase domestic applications.
- Voltage Requirements: The motors mustn’t constantly operate outside certain voltages. The general practice when it comes to operating voltage is to offer 240V because it safeguards both performance and safety. Several technical applications also necessitate the stability of a high voltage for optimal performance. A few types of pumps may require up to 1800-2400 RPM for best performance depending on the load application.
- Amperage and Wire Gauge: The use of 10 or 12 AWG wires is recommended based on amperage requirements gathered from updated industry charts. One of the most important aspects involves ensuring that the wire and motor used can withstand the electrical code requirements without overheating which all top sources advocate against.
- Secure Connections: Most of the websites on electrical practices have emphasized that the securing of connections is necessary to avoid losing power. This extends to basic practices such as holding a stay or resulting nut against a housing retaining channel and then inserting screws to tighten. It also means approaches and potting materials to seal from dampness and rusting to enhance conduction so that greater current flows over time.
Adoption of these informed practices as guided by good technical references guarantees a strong and effective pump operation; answers have become more precise with higher level industry focus.
Frequently Asked Questions (FAQs)
Q: What tools do I need to replace the pool pump motor bearings?
A: To replace pool pump motor bearings, you will need a wrench set, screwdrivers, a bearing puller, a rubber mallet, and possibly a new capacitor. It may also be useful to have a motor repair manual specific to your pump brand (e.g., Hayward, Pentair, or Jandy).
Q: How do I know if my pool pump motor bearings need to be replaced?
A: Signs that your pool pump motor bearings need to be replaced include unusual noise such as grinding or screeching, reduced efficiency of the pump, or visible damage to the bearings when inspected.
Q: How do I remove the bearings from the pool pump motor?
A: To remove the bearings from a pool pump motor, first, disconnect the power and drain any water from the pump. Then, disassemble the motor by unscrewing the motor parts and removing the rotor and shaft assembly. Use a bearing puller to remove the front and rear bearings. Ensure that you also remove the water slinger if present.
Q: What is the role of the capacitor in a pool pump motor?
A: The capacitor in a pool pump motor helps to start the motor and maintain its running efficiency. It provides the necessary phase shift for the electric motor to start turning and achieve the required speed. If the capacitor is faulty, it can affect the motor’s performance.
Q: Should I replace the seals and gaskets when replacing the motor bearings?
A: Yes, it is a good idea to replace seals and gaskets when replacing motor bearings. Rubber seals, gaskets, and the water slinger can wear out and lose their effectiveness over time. Replacing them helps ensure a proper seal and prevents water leakage into the motor.
Q: Can I watch a tutorial on how to replace pool pump bearings?
A: Yes, there are many tutorials available online, including on platforms like YouTube. Watching a tutorial can provide a visual guide and step-by-step instructions to help you understand the process better.
Q: What brands of pool pump motors are commonly found?
A: Common brands of pool pump motors include Hayward, Pentair, Jandy, and others. Each brand may have specific models like the Hayward Super Pump or Pentair Intelliflo, which may require particular attention to detail during maintenance or repairs.
Q: How often should I check my pool pump motor bearings?
A: It is advisable to check your pool pump motor bearings at least once a year as part of routine maintenance. Regular inspection helps in identifying any wear and tear early, preventing more significant issues down the line.
Q: What are variable speed motors, and do they affect bearing replacement?
A: Variable speed motors (VSP) allow the pump to operate at different speeds, improving energy efficiency. While the basics of bearing replacement remain the same, variable-speed motors may have additional electronic components that need to be carefully handled during the process.
Q: Should I consider replacing the entire motor instead of just the bearings?
A: If the motor is very old or has multiple issues beyond the bearings, it might be more cost-effective to replace the entire motor. However, if the motor is in good condition apart from the bearings, then a bearing replacement is a feasible option. Consulting a motor repair shop can help you make the best decision.